
This article is dedicated to all the Allied soldiers, leaders, and civilians who helped to evacuate the Dunkirk pocket in desperate times. I hope this article does them justice.
Published May 26, 2020
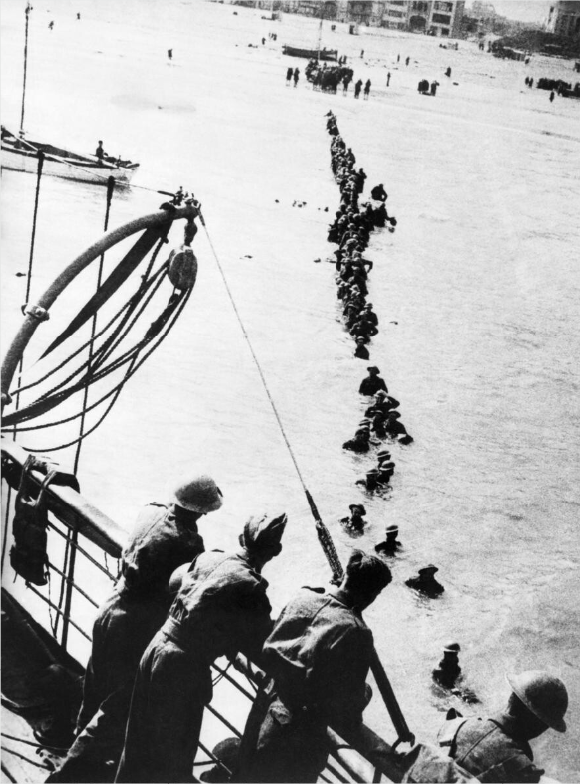
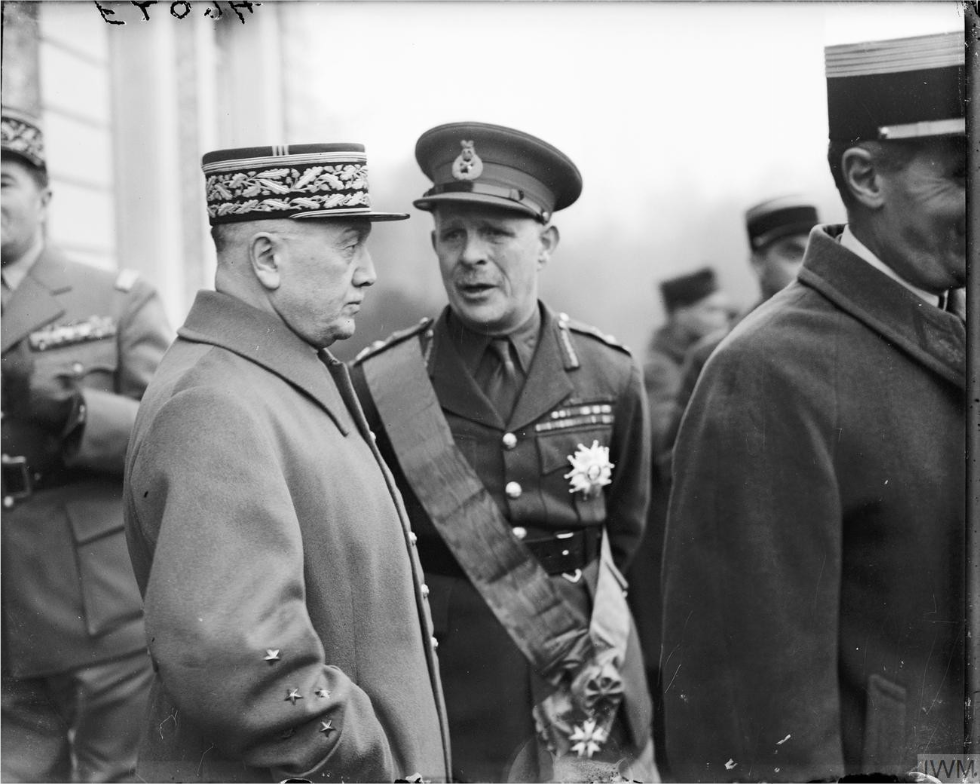
(© IWM HU 41240)
Introduction
France, May 1940. The Germans storm Western Europe and penetrate France through Sedan. They quickly trap hundreds of thousands of Allied troops in a massive salient in northern France and Belgium. Three different armies – the Belgian Army, the French First Army, and the British Expeditionary Force (BEF) – are cut off from the rest of the Allied forces. Unable to make the junction with the Allied forces, the British decide to retreat, soon followed by the French, with the Belgian forces eventually surrendering.
However, on May 24th, German Army Group A, located west and south of the Dunkirk pocket (see Map I at the end of the article), is ordered to stop. Two days later, on May 26th at 1857 hours, the British launch Operation Dynamo – the evacuation of the trapped Allied troops through the Channel.[1] The same day, the halt order is lifted, but Army Group A does not advance until the following morning at 0800 hours. As it turns out, a first halt order had already been issued on May 23rd at 2000 hours: consequently, most of the halted units had stopped for a total of three days and eight hours.[2]
When Dynamo started, the British thought that about 45,000 soldiers might be evacuated, and that the defenders could resist for “perhaps” two days.[3] In the end, the Allies would manage to hold off the Germans until June 4th – for about a week – and the British and the French would lift more than 330,000 soldiers from France.[4]
Most people, including historians, often seem to agree: the Allies did not stand a chance if it were not for the halt order issued by the German command to Army Group A. The campaign for Dunkirk is consequently often depicted as a miraculous event that does not owe its success to the tenacity and skill of the Allied troops and their leaders, but rather to an allegedly senseless German mistake.
However, a careful analysis of the events tends to reveal an entirely different truth, which, as it turns out, is much more epic than the version most people believe. Before going any further, it is essential to note that the conclusion was not reached due to dishonest cherry-picking used to prove a specific, pre-made claim. Quite the contrary, this article is based on an objective analysis of the situation. It is because of all the research made that this conclusion was reached.
This article will first present two elements about the German forces to understand some critical aspects of the Dunkirk campaign. Then, the main Allied strengths will be presented, to demonstrate how the defenders managed to avoid being crushed. Finally, the article will address some key points which would arise if the Germans had not stopped because of the halt order and had kept attacking instead.
German Difficulties: Obstacles to a Swift Reduction of the Dunkirk Pocket
The German forces did not merely have to push forward on May 24th to destroy the Allied pocket. As a matter of fact, the halt order appears to have had a relatively limited impact in the first place. Further, and maybe more importantly, ambient operational chaos among the Germans negatively impacted their effectiveness.
The German Halt Order: A Relatively Limited Impact
As previously stated, most people seem to believe that the halt order issued to Army Group A is the reason why the Allies were able to evacuate in the first place. Per this order, issued on May 24th and in effect until May 26th, Army Group A was to stop the offensive on the Dunkirk pocket.
Contrary to what can be assumed, this order had a perfectly valid, while arguable, reason: Allied tactical counterattacks in Montcornet on May 17th and 19th and in Arras on May 21st frightened Army Group A Generals von Rundstedt, von Kluge, von Kleist, and eventually Adolf Hitler himself.[5] While these counterattacks were only local and of a limited scope, they led the Germans to think that the Allies might soon conduct a large-scale counteroffensive which could stop the German onslaught – a frightening reminder of what the French and the British had accomplished with the 1914 “Miracle of the Marne” in the previous conflict.[6] Consequently, Army Group A paused its offensive to give time to the infantry divisions – which had not yet caught up with the rushing panzer divisions – to get closer to the frontline.[7]
Moreover, the German command also believed that the Allies were unable to conduct a seaborne evacuation.[8] Finally, Hermann Göring, the head of the Luftwaffe – the German air force –, believed that his forces alone could prevent the Franco-British forces from escaping.[9] Consequently, the halt order was the product of fears over a hypothetical, large-scale Allied counterattack and the belief that the British and French forces could not escape anyway.
However, while the halt surely helped the Allies, it does not appear to be what saved them. Indeed, while it might seem surprising, this decision had a secondary impact on the battlefield, rather than a decisive one. There are several reasons why.
First, while the halt was in effect, only one German infantry division from Army Group A reached the frontline. Indeed, between the issuance of the halt order on May 24th and the order to renew the offensive on May 26th, five new divisions reached the pocket to help reduce it in the following days. However, four of them were panzer divisions (see Maps I and II).[10] Of Army Group A, the 20th Motorized Infantry Division was the only infantry division that reached the frontline in the meantime.[11] And as will be later detailed, panzers were of limited effectiveness in the Dunkirk area. As a matter of fact, the German infantry divisions in the rear were slow to advance.[12] This partially questions the relevance of one of the main points of the halt order: giving time to the infantry divisions in the rear to join the panzer divisions who had moved forward quickly.
Second, and more importantly, the halt order did not trigger the Allied decision to evacuate. Instead, it is the impossibility to link-up with the French Seventh Army in the south which triggered the BEF evacuation.[13]
The Allies had planned a counterattack in the south to breakthrough and make the junction with the French Seventh Army and rejoin the rest of the Allied forces (see Map I). Three French and two British divisions – the 5th and 50th – were meant to establish bridgeheads south of the Scarpe river on May 26th, to be followed by the main assault the following day.[14] However, on May 25th, the Belgian line in the east started cracking, which left a threatening gap between the Franco-British and Belgian forces. Because of this, General Lord Gort, who was in charge of the BEF, decided not to use his forces in the planned counteroffensive but instead sent them in the east to plug the gap (see Maps II and III).[15] After this move, the French canceled the counteroffensive specifically designed to join the French Seventh Army in the south. Without British support to launch the assault, they decided to withdraw with the British instead.[16]
It is what triggered the evacuation: a week before, Lord Gort had already decided that if the junction with the French Seventh Army could not be made, he might be forced to retreat to the coast. The War Office and the Admiralty shared this view. Consequently, the British government authorized Lord Gort to evacuate the area and reach the coast when it became impossible to make the junction.[17]
Therefore, the direct reason for the evacuation is the cancelation of the southward offensive, since it made any junction with the rest of the Allied forces impossible. The indirect reason is the cracking of the Belgian line on May 25th, which created a gap between the Franco-Britsh and Belgian forces. This forced Lord Gort to plug the gap with the 5th and 50th Divisions, both of which were preparing the southward offensive to make the junction.
German Operational Chaos
Stating that the halt order is the reason why the Allies escaped ignores significant organizational difficulties the Germans were facing at the time. Indeed, before May 31st, all the German forces dealing with the Dunkirk pocket were very disorganized: they were under the command of two army groups, three armies, and 15 corps. Each had its own objectives, means and ways of destroying the enemy before them.[18] Consequently, they had no real operational aim, and no single commander was in charge of achieving one.[19] There was no clear plan. Operations, orders of battle, lines of responsibility and even the overall objectives could be changed and adapted on a daily and ad hoc basis.[20]
Moreover, starting on May 28th, the Germans increased their focus on Fall Rot (Case Red) – the plan to deal with the rest of France.[21] From then on, the reduction of the pocket received less attention.[22] Such operational chaos was corrected only after May 30th, when the German failure to push forward, combined with the preparations for Fall Rot revealed the flaws of the disjointed and dysfunctional command arrangements.[23] Even after one single commander – General von Küchler – was put in charge on May 31st, the Germans still lost time: due to the reorganization, it took a whole day to launch another assault.[24] By then, the Allies had already evacuated 194,620 soldiers.[25]
The German operational chaos resulted in a slowdown of the operations and an inability to push forward effectively. Indeed, as soon as May 28th, only a day and a half after the halt order was no longer in effect, Army Group A issued no fresh directive, and there was no coordination between Army Groups A and B. “Slowly, various corps halted and reorganized while others struggled forward.” [26] Army Group A’s main priority now was the next offensive southwards, although the Allies were still evacuating and that the Germans were aware of this fact.[27] As a matter of fact, as soon as May 25th, Army Group A had considered its objective in northern France accomplished, despite the fact that the Allies were still holding the Dunkirk pocket.[28]
Consequently, even if the Germans had not stopped on May 24th, the ambient operational chaos would have a negative impact on the conduct of their operations. It confirms that it is unlikely that they would have easily crushed the Allies in such a situation because of disorganization.
Allied Skillfulness: What Saved the Day
While the Germans had difficulties, the Allies undeniably had decisive advantages which helped them to evacuate successfully. Notably, these were their ability to quickly organize the evacuation, their tactical awareness, and their resilience and adaptability.
The Decision and Quick Organization of the Evacuation
Stating that the halt order is why the Allies escaped ignores several key factors that heavily played in favor of the Allies. The very first reason they could escape is that they – especially the British – devised an escape plan quickly and efficiently.
As soon as May 17th, a week before the German halt, Winston Churchill considered evacuating the BEF.[29] On May 20th, four days before the halt order was issued, Vice Admiral Ramsay was instructed to assemble the shipping required and begin the planning for evacuating large numbers of British troops.[30] On May 24th, the day the halt order was issued, a policy of partial evacuation was laid down, and on May 26th, the policy of complete evacuation was accepted by the British government.[31] Moreover, even before Operation Dynamo took place, the British already had some experience in such an exercise: for nearly a week, evacuations from Dunkirk had taken place to evacuate unessential personnel.[32]
Furthermore, the British were fast in the execution and adaptation of the evacuation plan. Indeed, on the first full day, only 7,669 soldiers were taken from France. At this rate, it would have taken 40 days to lift the BEF. Consequently, Vice Admiral Ramsay and his staff adapted and asked the Admiralty for more destroyers to participate in the operation.[33] Therefore, as soon as the British realized the evacuation needed to be carried out faster, they took the necessary measures to do so. The next day, 17,804 people were lifted, and the following day 47,310.[34]
Consequently, the very first reason the Allies were able to evacuate is not the halt order, but the quick and appropriate decision and organization of the evacuation. As shown, the British already were considering it a week before the halt order was in force, had already started taking off some of their personnel, and already laid down a partial evacuation plan the day the halt order was in effect.
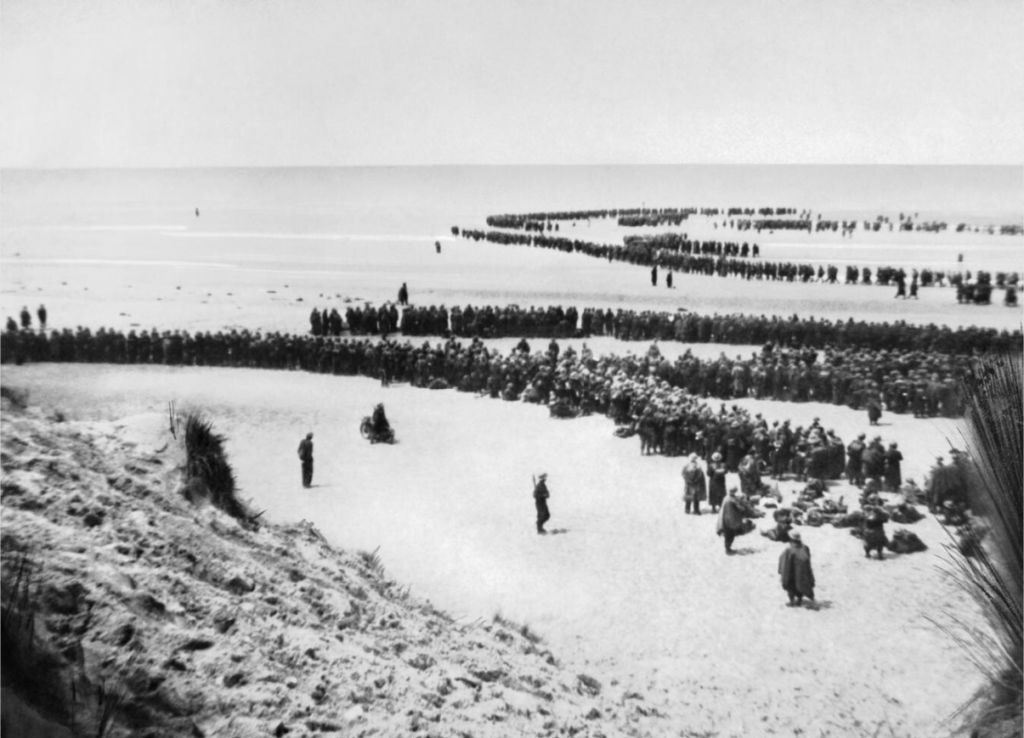
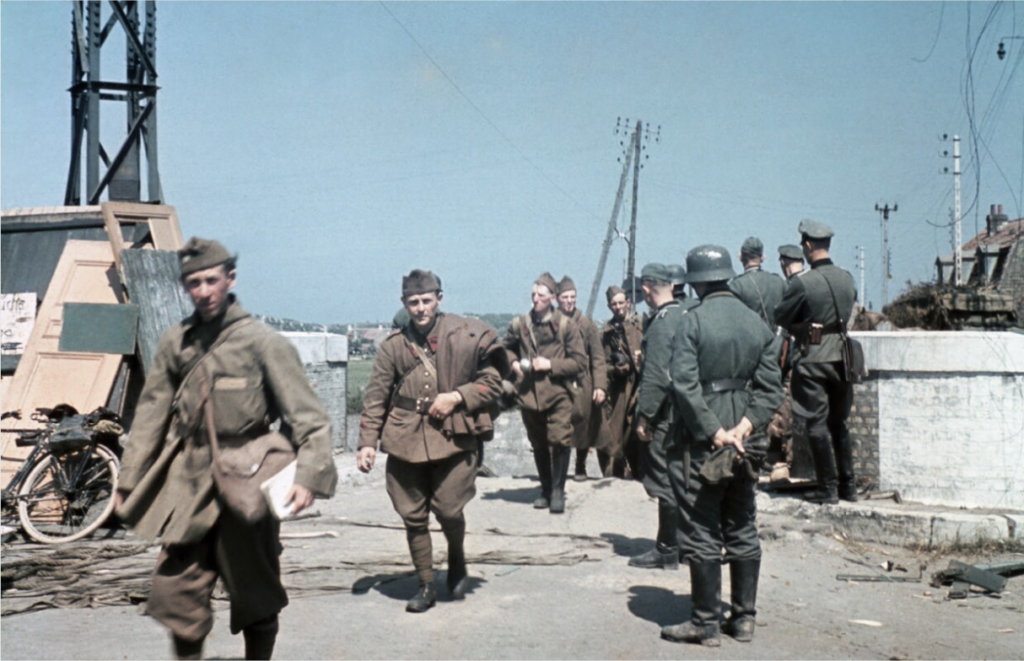
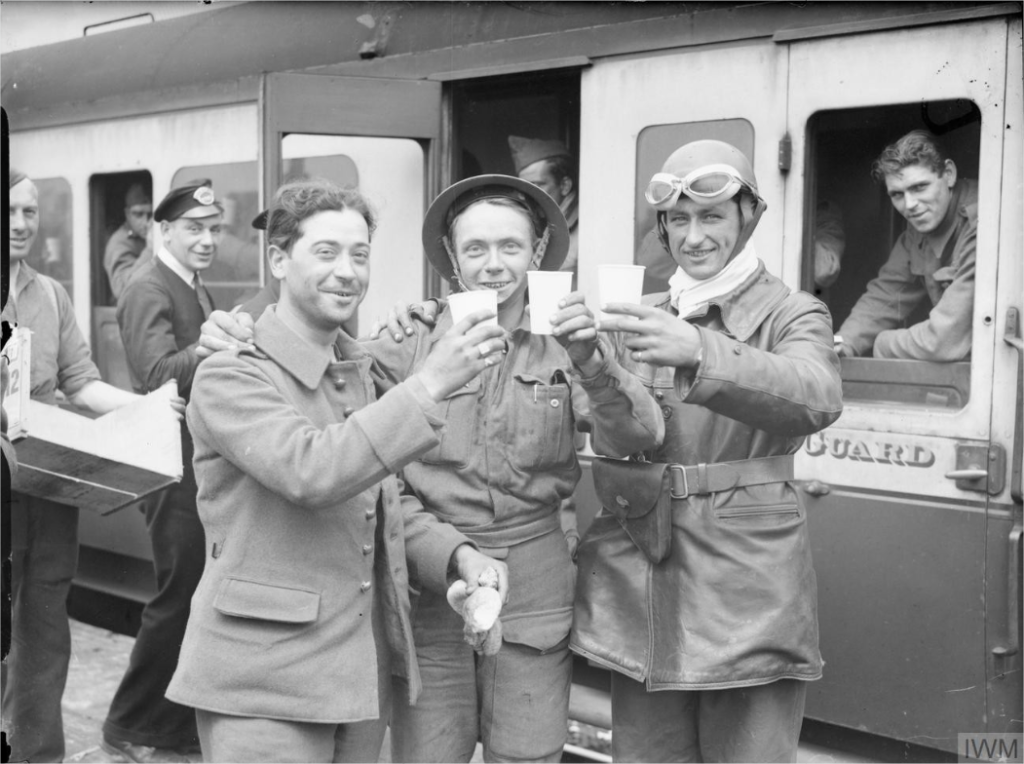
(© IWM NYP 68075)
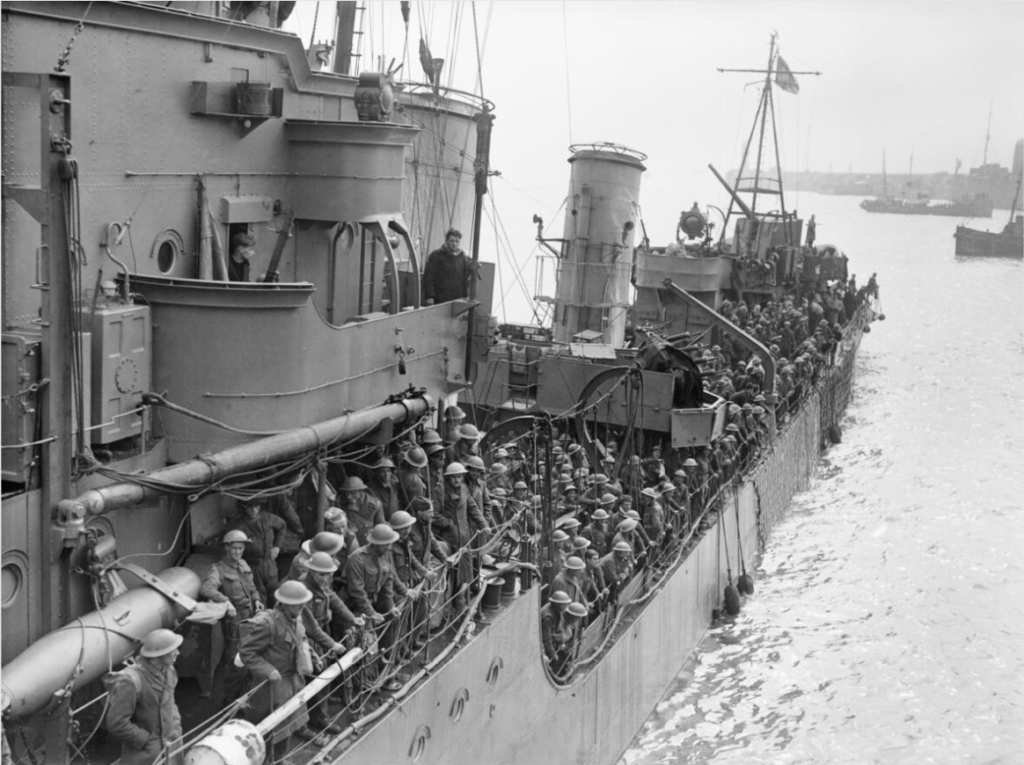
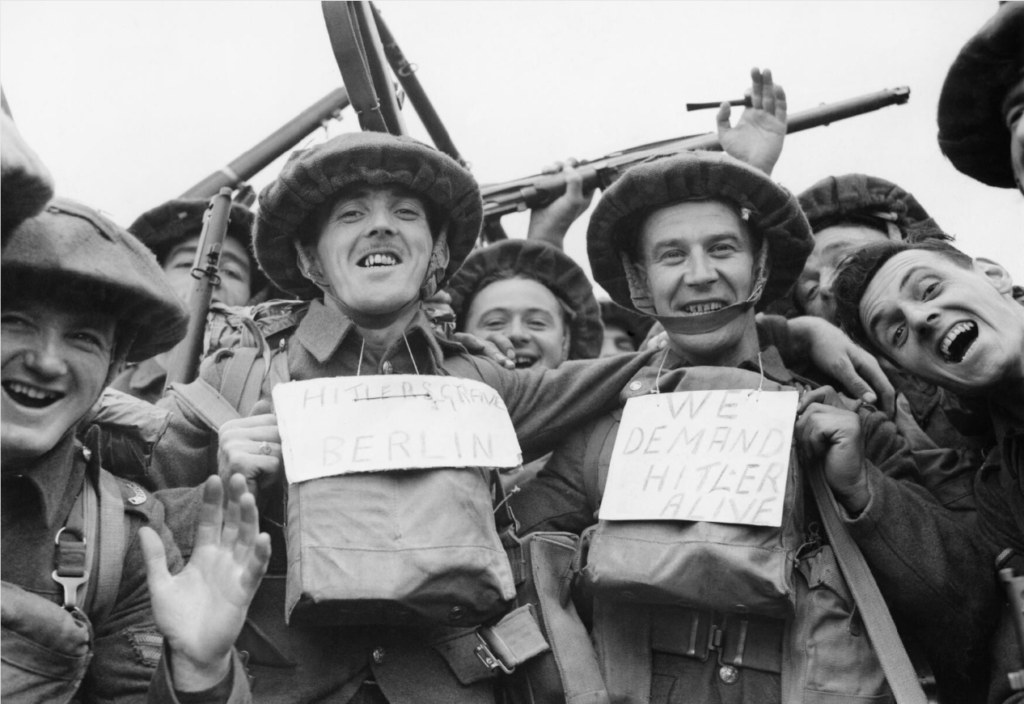
(© IWM HU 104617)
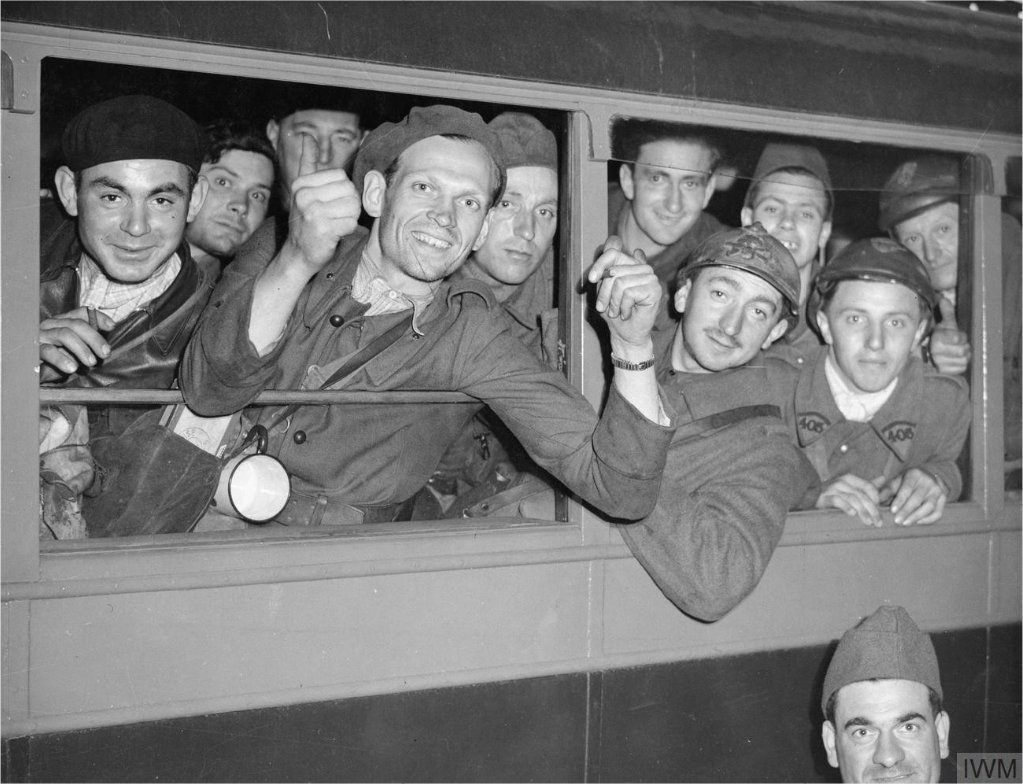
(© IWM H 1637)
Tactical Awareness: General Lord Gort’s Decision to Protect the Eastern Flank
As demonstrated earlier, the real element which triggered the Allies to evacuate is not the German halt order. Instead, it is the decision taken by General Lord Gort to send two of his divisions – the 5th and 50th – to protect the gap eastward of the pocket.
This move is very likely what actually saved the day and allowed the Allies to evacuate: both German Army Groups A and B, on May 27th, sought to break through the Allied lines west and east to meet up on the Poperinghe-Kemmel line, directly behind the Ypres-Comines line, which the British 5th and 50th Divisions were now holding thanks to the order given by Lord Gort to plug the gap (see Map III).[35]
If it had not been for this order, the Germans might have breached the pocket through the eastern gap and trapped several British divisions – possibly almost all of them – along with the French 12th Motorized Infantry Division, the remnants of the 32nd Infantry Division, and the badly depleted Cavalry Corps.[36] It would likely have resulted in a significantly reduced number of evacuees, and many less defenders to protect the Dunkirk pocket while the evacuation took place. It is why this move is probably the decisive element that allowed the evacuation to be so successful.
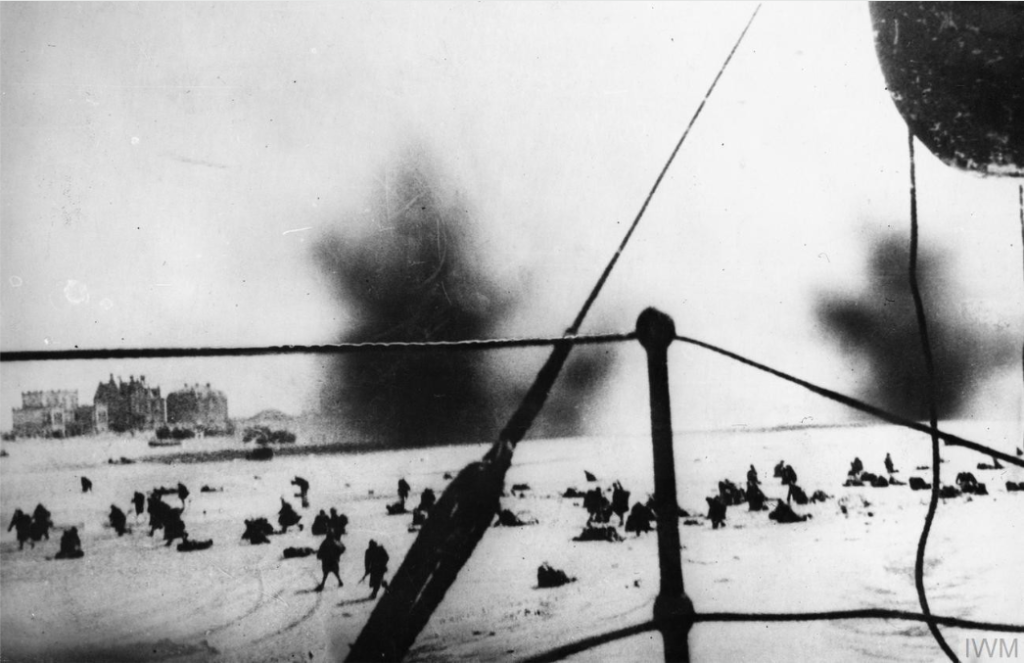
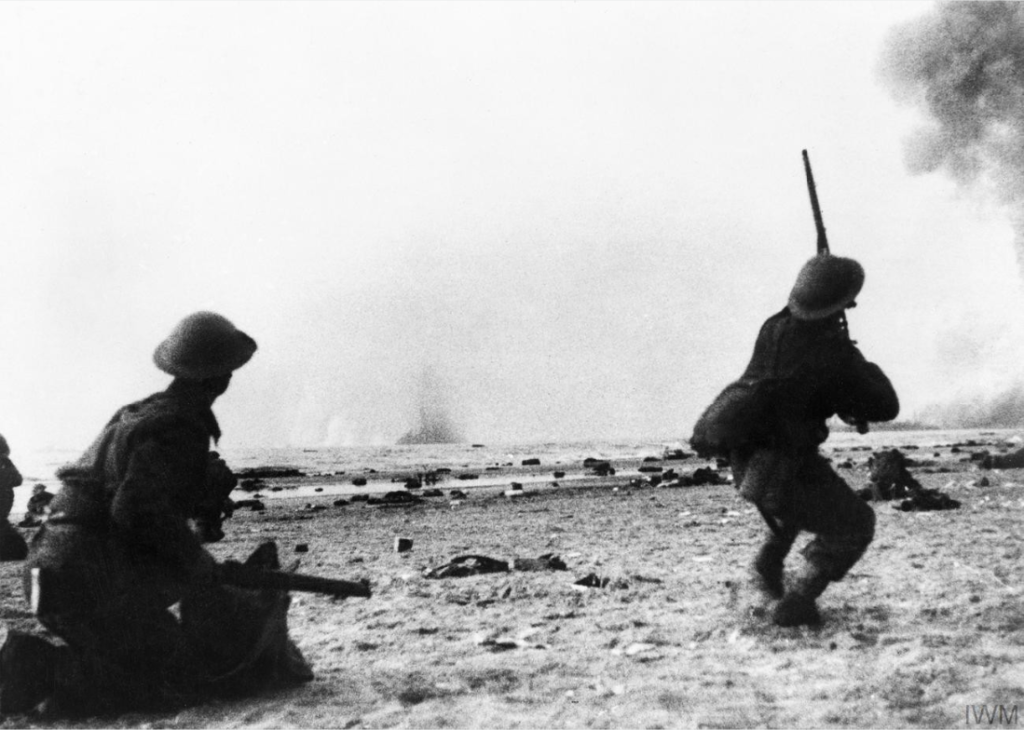
(© IMW F 2094)
Allied Resilience and Adaptability
Stating that the halt order is why the Allies escaped ignores the tremendous stubbornness with which the defenders – both British and French – held the Dunkirk pocket. Unlike what could be assumed by some, the Germans were not facing powerless troops that did not have the strength and resolve to fight. Allied resilience truly played a crucial part in the success of the evacuation.
There are several examples to illustrate this claim. For instance, on May 27th, the British 2nd Division, while facing four German divisions – the 3rd, 4th, 7th Panzer, and the Waffen-SS Totenkopf – fought hard to keep the line of retirement open.[37] The Germans themselves acknowledged the tenacity of the defenders and the fact they were not able to make “any notable headway to the east or north-east” as they tried to trap the Allied forces through the Poperinghe-Kemmel line.[38]
On May 30th, all the divisions defending the Dunkirk beachhead were “greatly reduced in strength,” yet managed to put up a stubborn defense which was once again acknowledged by the Germans.[39]
In Lille, south of the pocket, the French resisted for three days through heavy fighting despite being surrounded. Such a resistance helped to tie down seven German divisions, including three to four infantry divisions (see Maps IV and V).[40] The city held until its defenders ran out of ammunition on June 1st. The Germans even allowed the French defenders the honors of war, marching out of the city in formation with their weapons.[41]
While facing an overwhelming force, French forces conducted pre-emptive assaults to spoil the German initiative.[42] On June 2nd, the French launched a vigorous counterattack and recaptured an area east of Hoymille which was previously occupied by the Germans. Attacking with 550 men and supported by two reconnaissance groups and six Somua S35 tanks, only 65 survived unharmed and withdrew, unable to hold the ground regained.[43] On the eastern end of the perimeter, the German 56th Infantry Division got repulsed with heavy losses. A counterattack made by the French 150th Infantry Regiment even netted 60 prisoners.[44]
On June 1st-2nd, the French, in particular the 68th Infantry Division on the western end of the perimeter, repulsed several large German assaults. Their morale did not collapse despite the critical situation which they were facing.[45] For five days, the French rearguard held off the Germans, helping the bulk of the trapped forces to escape until June 4th. Then, the German 18th Infantry Division entered the city and the remaining 40,000 French troops of the rearguard, unable to escape because of a late flow of unexpected troops trying to embark, surrendered.[46]
(© IWM COL 294)
The ability of the Allied commanders to improvise with makeshift forces and organize defenses “on the job” also played a vital part. Maybe the best example is Lord Gort’s decision to send the 5th and 50th Divisions to protect the eastern flank, even though they were meant to participate in a counterattack southwards and were on the opposite side of the pocket (see Maps I and II).[47] Additionally, the area held by the 5th and 50th was stiffened up with as much artillery and other support from other locations.[48] A hybrid force of engineers and artillery components fought as regular infantry, and held its position.[49]
At some point, the British took over a scratch force of 200 artillerymen, bolstered from time to time by fitters, surveyors, transport drivers, and headquarters clerks. Its officers came from five different regiments. The unit did not even have a name. As they met disbanded Belgians trooping back, they picked their discarded rifles and ammunition to add them to their arsenal. This makeshift unit held its position for 30 hours.[50] Another example: when the 5th Division got part of its line breached, Lord Gort sent everything he could to reinforce it: two brigades of the 50th Division, three battalions of the 1st Division, and the French 1st Light Mechanical Division. These reinforcements enabled the British defenders to plug the breaches made and stop the German advance.[51]
These illustrations reveal the tremendous tenacity and adaptability of the defenders. They allowed the Allied forces in the pocket to successively defend their positions while covering retreating units, then move and hold new positions until the beaches were reached. The Germans, on the other hand, were slow to adjust their forces to the situation and unify them under a single command. Consequently, even if they had not stopped on May 24th, the Germans would have likely faced tremendous resistance, which would be determined not to let them breach the pocket.
(© IWM FX 7529)
What if the Germans Had Not Stopped
As demonstrated above, even without the halt order, the Germans would most likely have had a hard time reducing the Dunkirk pocket. However, this is not enough to demonstrate that the Allies would have likely escaped even without the German halt. The following part will consequently address additional elements to analyze what could have happened had the halt order not been issued. Four main elements come to mind: what would happen regarding the eastern gap which triggered Lord Gort to send the 5th and 50th Divisions, how would the evacuation be impacted, the number of German troops, and the impact of the panzers.
The Eastern Gap
If the Germans did not stop on May 24th, the eastern gap – which is why the evacuation eventually starts – would not exist on that day. Indeed, such a gap appeared only on May 25th. However, this would likely not change the situation: the planned counteroffensive in the south was to start on the 26th, and German Army Group B, located east of the pocket (see Map I) and dealing with the Belgian forces, was not issued the halt order. The halt order applied to Army Group A.[52] Consequently, the Belgian army would start cracking on the 25th regardless, leaving time for the British to notice the imminent danger in the east.
Moreover, Lord Gort already knew that if he sent his troops in the south as convened, he would be cut off from the coast and completely encircled.[53] Furthermore, on the 25th, the French only had one available division, while they had planned for three divisions and 200 tanks to participate in the counterattack. Additionally, there were indications that French General Blanchard was unable to formulate a good counterattack plan.[54] Lord Gort was not trusting the French in their ability to perform such a move.[55] Finally, German probing raised fears that Army Group B was going to cut the line of retreat, and link-up with the panzers in the Allied rear.[56]
Consequently, Lord Gort would still likely send his two divisions in the east, since the Belgian line cracked on the 25th, a day before the planned counteroffensive, leaving time for him to adapt to the critical situation, and since he was skeptical about the southward counterattack in the first place.
The Evacuation
If the Germans kept pushing on May 24th, it seems very likely that Operation Dynamo would adapt to the circumstances. Indeed, as stated earlier, the British were already evacuating some of their personnel, and a partial evacuation plan was laid down on May 24th. Moreover, under emergency, whenever Vice Admiral Ramsay wanted something, it was given to him. The view of “utter and absolute urgency” was prevailing, and the necessities of the moment were dictating everything.[57]
As soon as May 24th, there was a realization that it was vital to prepare for a chaotic retreat of small parties of troops along the coast. The flexibility of Vice Admiral Ramsay was “apparent.” The plan shifted from a “sort of shuttle service […] to the desperate picking up of men from open beaches.”[58] When the first evacuation plan proved to be inadequate given the few amount of soldiers lifted during the first full day of Dynamo, the British changed it and put in place a second, more effective plan.[59] As an illustration, and as stated earlier, after realizing it would take 40 days to evacuate the entire BEF at this rate, Ramsay asked the Admiralty to take destroyers off other jobs to support Dynamo. In 24 hours, the results showed: 10,000 more soldiers had left Dunkirk. The following day, 40,000 more.
Moreover, by the same day Dynamo was approved, the organization and defense of the Dunkirk beachhead were already taking shape: units were sent directly for evacuation or asked to remain to defend the perimeter.[60] Further, the city and its suburbs were already fortified thanks to the works of French engineer Vauban about two centuries and a half ago.[61] Furthermore, at least northwest of the pocket (in the Gravelines-Dunkirk sector), the French for once had local firepower superiority. Indeed, they had significant artillery support available compared to the German forces in the area, who had theirs tied up in the battle of Calais. Additionally, the Royal Air Force could provide more fighter cover in the zone. Finally, there were many anti-aircraft defenses in the sector.[62] Therefore, even without the halt order, the Allies would likely still be able to organize defenses around the beachhead and to hold off the Germans at least for a time.
Consequently, even if the Germans kept attacking on May 24th, it is very likely that the British would have been able to adopt and adapt the plan to carry out the evacuation.
(© IMW TR 2626/Wikimedia)
The Number of German Troops
Assuming that the Germans would merely have crushed the Allies had they kept attacking on May 24th ignores the fact that the attackers would actually have had fewer troops to reduce the pocket. Indeed, the Belgians would still surrender on the 28th, since Army Group B, which dealt with them, did not receive the halt order. Therefore, the fighting between the Germans and the Belgians was not affected by the halt. Consequently, it would mean that not only the Allies’ eastern flank would be protected for longer while Army Group A attacks, but that for four days, the Germans would have fewer troops to reduce the Franco-British pocket.
Indeed, the Belgian surrender made eight additional German infantry divisions available to reduce the rest of the pocket.[63] Consequently, if the Germans kept pushing on May 24th instead of May 26-27th, it would mean that they would have had four full days without these additional divisions to attack the Allies. During the course of actual events, the Germans had only about one day without these divisions, since they properly resumed their offensive on the 27th and that the Belgians surrendered on the 28th.[64]
Furthermore, as mentioned earlier, the halt order seemingly did give time for five other German divisions from Army Group A to reach the Franco-British frontline. Indeed, the 20th Motorized Infantry Division, the 3rd, 4th, 6th and 1st Panzer Divisions reached it by May 26th. Therefore, if the Germans kept pushing on May 24th, these divisions could be unavailable for one or two days to reduce the pocket.
Consequently, if the Germans kept pushing on May 24th, they would have to attack the Franco-British pocket with eight divisions less in the east for four days – as opposed to just approximately one day in reality –, and five divisions less in the west and south for one or two days. Simply put, if the Germans had kept pushing on May 24th, they would have had 13 divisions less to destroy the Franco-British forces for approximately one or two days, of which eight would be unavailable for four days. Since the Allies managed to resist the German advance when the attackers did have all these five to 13 additional divisions available, they would still likely resist against a reduced number of German troops.
The Impact of Panzers
In the Dunkirk campaign, German panzers withdrew before the pocket was completely reduced in part because General von Rundstedt, in charge of Army Group A, preferred to save his armored units for Fall Rot.[65] However, if the Germans had kept pushing on May 24th, it is unlikely that the presence of panzers would have had a decisive effect.
First, General Guderian himself was reluctant to use his panzers in unfavorable terrain, which is what the Dunkirk area was, and because he considered the infantry to be more suited to accomplish the assault in such a terrain.[66] While the terrain was unfavorable partially due to the rain, it likely would have remained the same even without the halt order: heavy rain would still fall on May 28th.[67] Furthermore, the terrain in the area was easily flooded, its ground was low-lying and filled with ditches. It was almost impassable by armor and guns, except on built-up conspicuous roads with ditches either side. A few well-sited guns could make them unusable.[68] For instance, on May 30th, the 9th Panzer Division fought the French 225th Infantry Regiment in the Dunkirk area, but was repelled twice and made little progress because of determined defense, well-placed artillery and anti-tank batteries, and difficult terrain.[69]
Second, regardless of the already difficult terrain around Dunkirk, panzers tended to be weaker in urban areas: even when roadblocks and anti-tank guns were destroyed, they could show reluctance to close with the enemy, as proven in the German assault of Calais.[70] As a matter of fact, the Germans had already found out in the campaign of Poland of September 1939 that armored formations were ill-suited for urban warfare.[71] Additionally, General Guderian’s panzer divisions – engaged west of the pocket – were spent after two weeks of continuous combat.[72] Indeed, half of his vehicles were non-operational because of damage sustained during previous battles and mechanical defects. Furthermore, the troops were exhausted.[73]
Third, the panzers would very likely withdraw from the Dunkirk area at some point anyway. During the actual battle, they withdrew on May 29th at 1000 hours, following a recommendation from General Guderian, and with Hitler’s approval.[74] As stated above, it is in part because of the difficult terrain, but also to prepare Fall Rot. Indeed, German commanders started properly focusing on the rest of the French campaign around May 29th-30th.[75] Moreover, General von Rundstedt believed he had accomplished his real task when his forces reached the coast, cut British communications, and seized the other Channel ports.[76] Consequently, he did not engage most of his armored units: only the small 9th Panzer Division remained thereafter.[77] Therefore, the Germans would likely withdraw most of their panzers at some point anyway to prepare Fall Rot andbecause of the unfavorable terrain.
Consequently, the presence of panzers for some days in the Dunkirk area would likely not tip the balance. Therefore, the presence of panzers in the Dunkirk area does not appear to be a decisive factor.
Conclusion
The evacuation of the Dunkirk pocket was a tremendous and unexpected success. However, most people, including historians, seem to believe that it was the case because of one single German mistake: the halt order. This article attempted to demonstrate instead that the evacuation was a success because of the amazing resilience, adaptability, and clairvoyance of the Allies. This article tried to prove that the German halt order issued to Army Group A – while beneficial to the Allies – was not what decided the outcome of the Dunkirk campaign.
The Allied troops and commanders must receive credit instead: they are the ones who decided to evacuate before it was too late, the ones who outmaneuvered their opponents and resisted tirelessly against much more numerous German divisions, and the ones who successfully evacuated in desperate conditions more than 330,000 soldiers in about nine days.
Of course, the German halt order did help, as it gave the Allies time to better organize their defenses and the evacuation. However, it does not appear to be the decisive element in the success of the evacuation. Instead, the decision by General Lord Gort to close the eastward gap at the right moment appears to be the decisive element. Furthermore, even if the halt order had been such a gross mistake, the Allies should also receive credit for it. As stated earlier, the halt order finds its source in Allied tactical counterattacks which frightened the key German decisionmakers. Consequently, even when looking at the origin of the halt order, the action of the Allies must be recognized and applauded. There are few Allied strategic feats in 1940. Let us include Dunkirk in these.
On the 80th anniversary of the epic evacuation of Dunkirk, people must realize that it was an Allied victory which happened mostly thanks to the incredible bravery, tenacity, skill, and improvisation of Allied soldiers and leaders. It is high time we all recognize the heroic valor of the Allies in northern France and Belgium in 1940.
(© IMW H 1703)
(© IWM HU 104612)
(© IWM HU 104615)
For more pictures on the evacuation of Dunkirk, visit https://www.iwm.org.uk/collections
The author would like to extend his sincere gratitude to Erick Plascencia, who kindly reviewed this article.
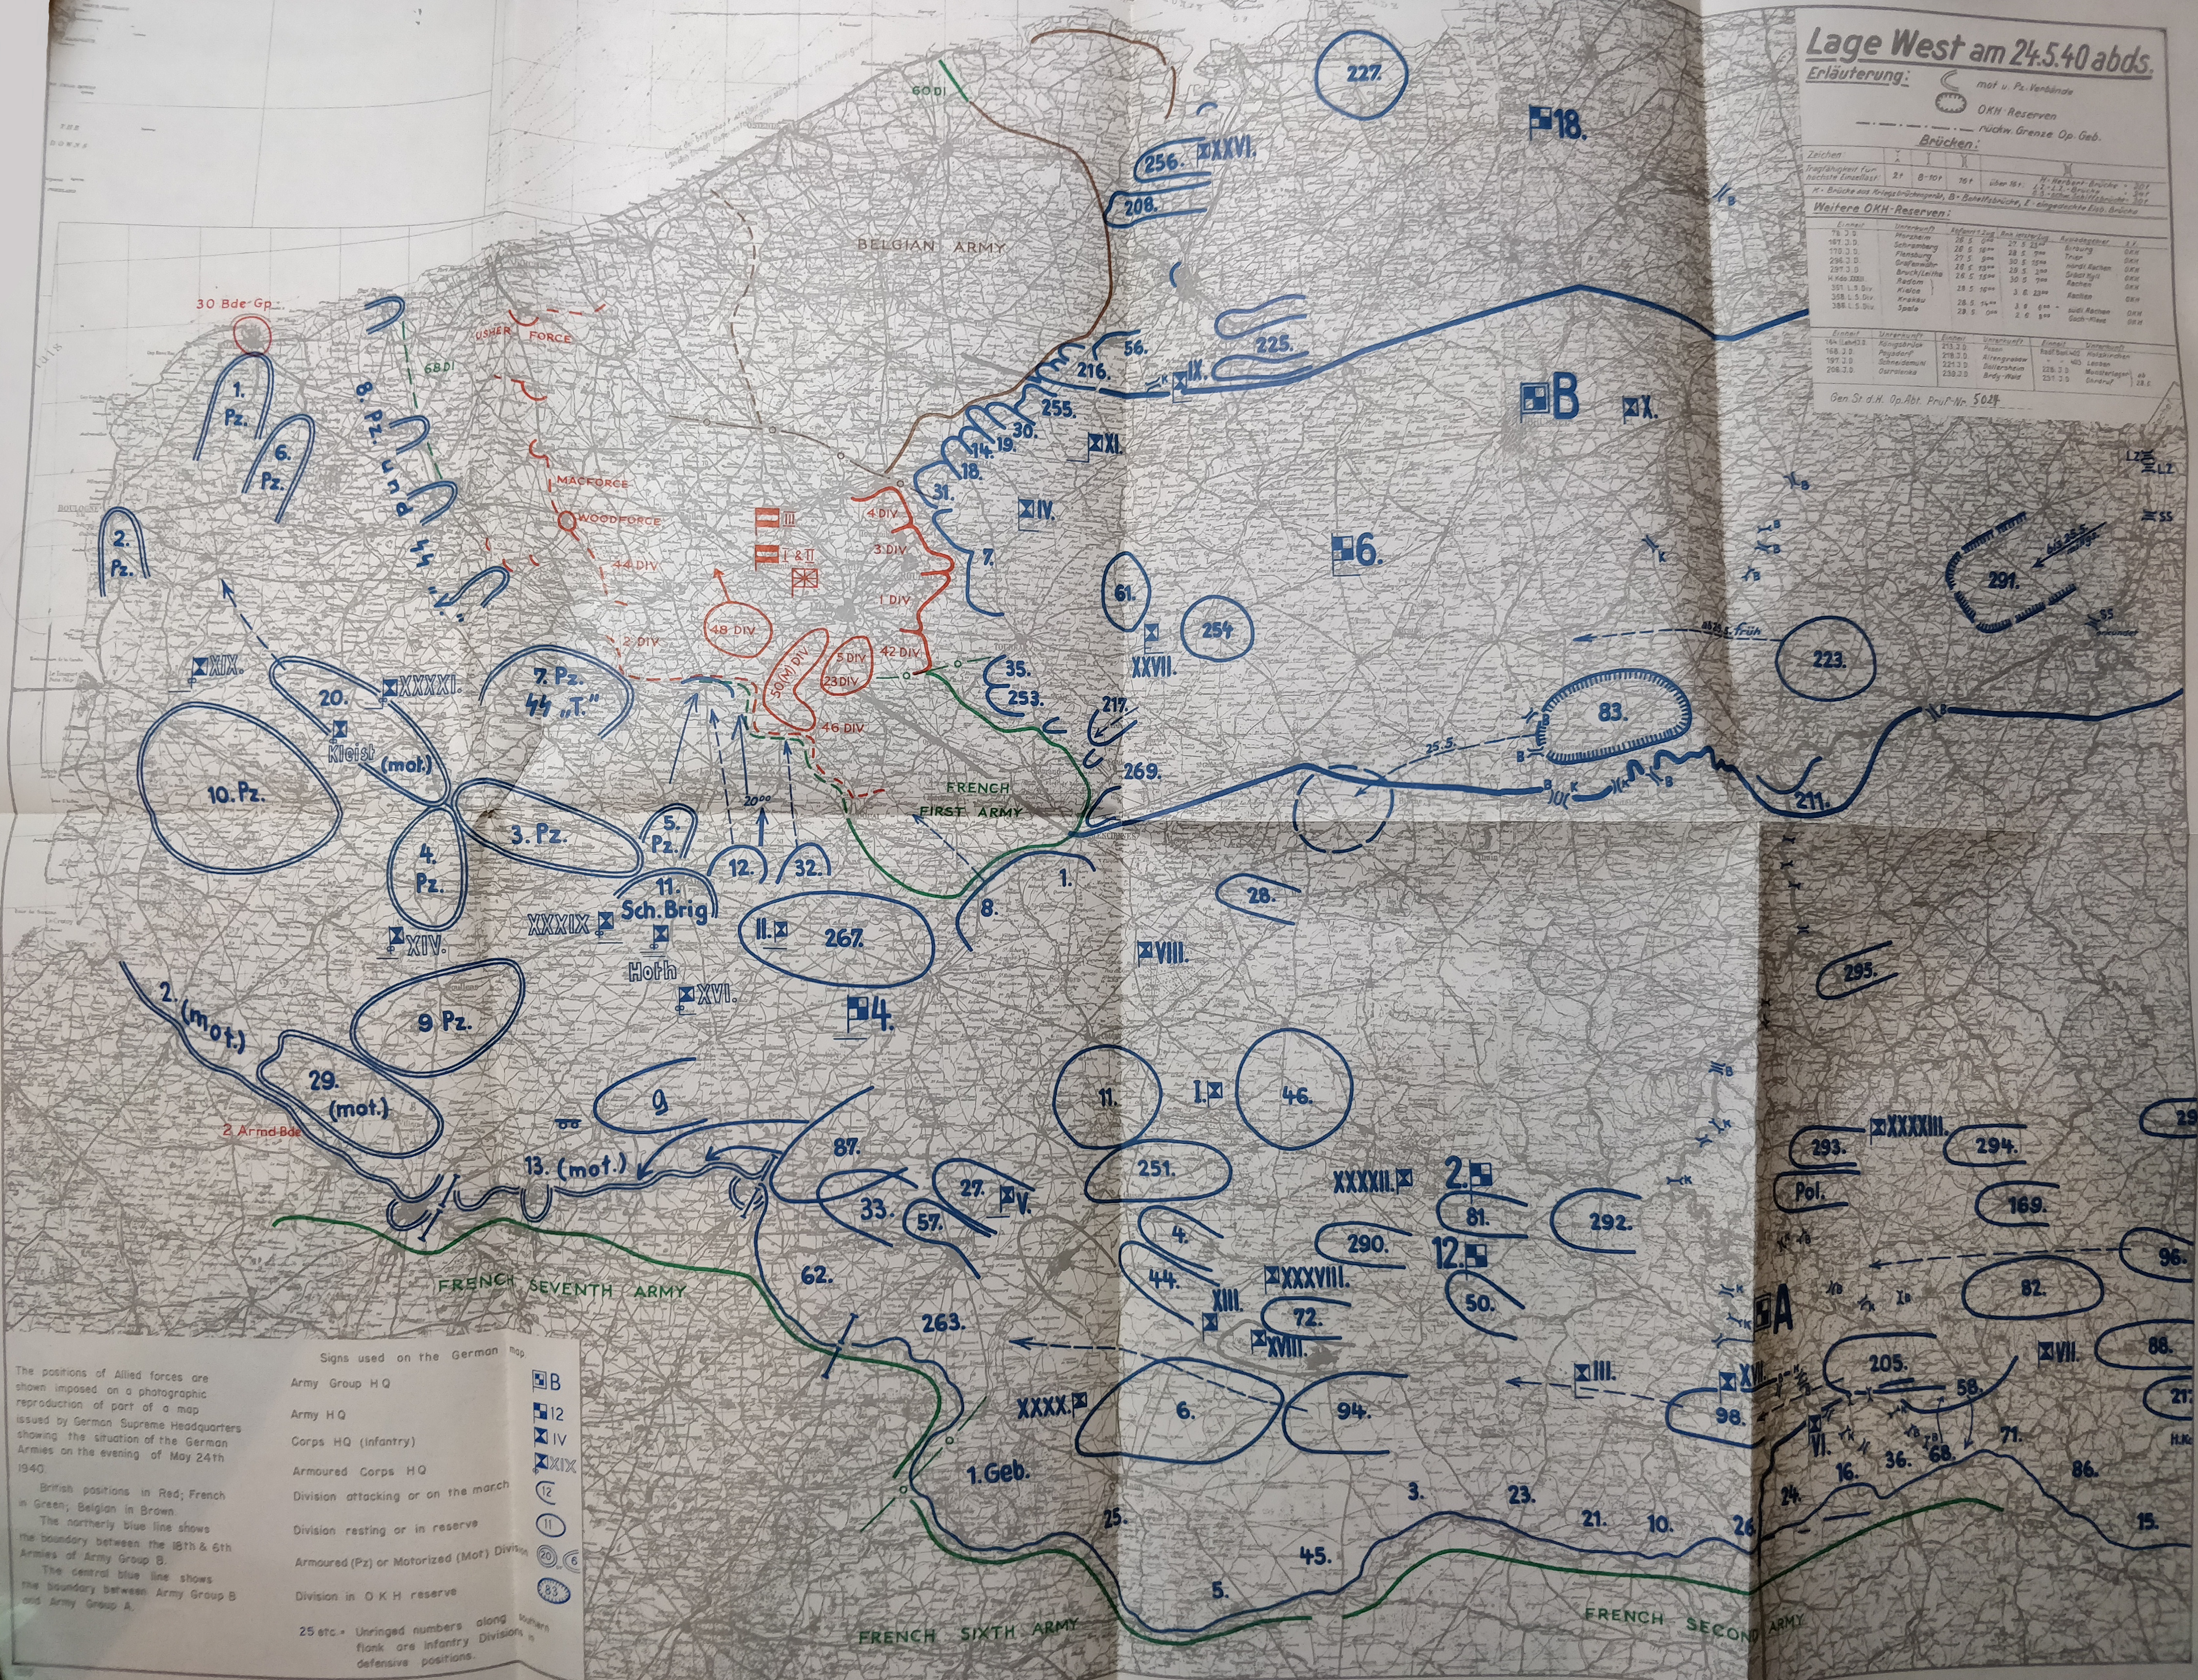
Situation on the evening of May 24th
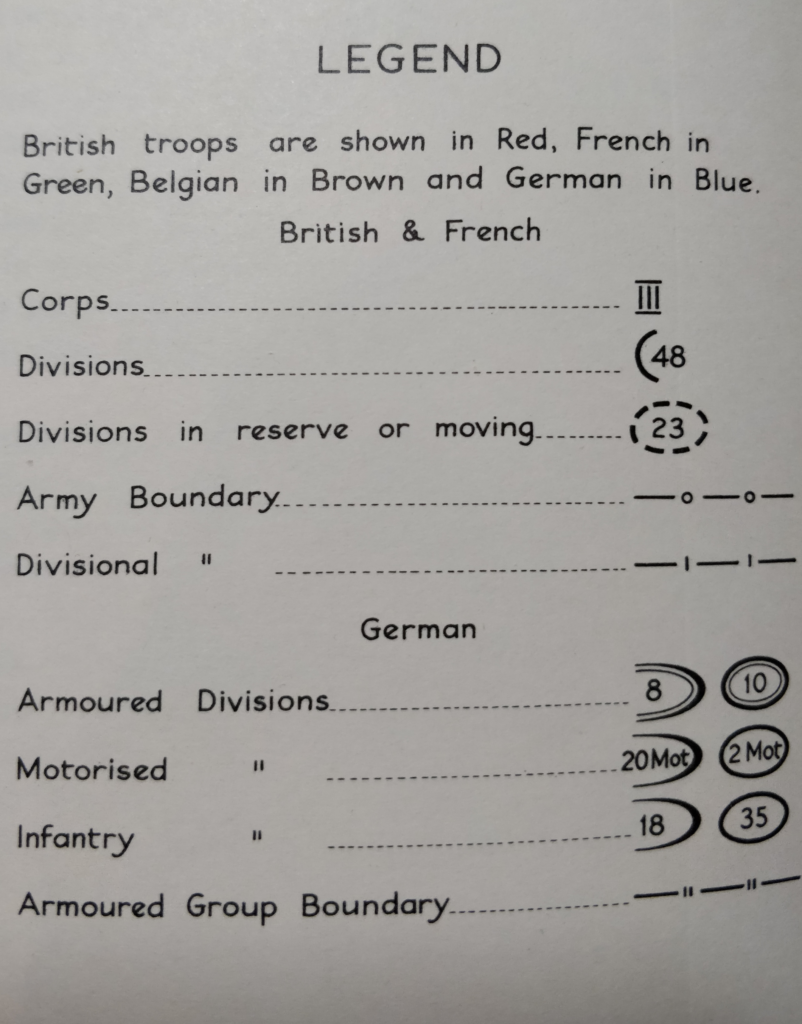
Blue: German forces; Red: British forces; Green: French forces; Brown: Belgian forces. Double-lined units are armored divisions, other units are infantry divisions. Half-circled units are attacking or on the move. Fully-circled units are either resting or in reserve. See legend below.
German Army Group A, located west and south of the pocket, is ordered to stop by Adolf Hitler at 1131 hours. The order is promulgated at 1245 hours. Note the location of the British 50th and 5th Divisions, which were in position to participate in the southward counteroffensive to join the French Seventh Army. They were soon to be rushed to the opposite side of the pocket northward to plug the gap.
The German forces managed to split the Allies, isolating the French First Army, the BEF, and the Belgian Army. The French Seventh Army is located southwest of the pocket. Germany accomplished what it had failed to do in 1918.
Sources: Grumberg, “Dunkerque,” 24; Karl-Heinz Frieser, Le mythe de la guerre-éclair : La campagne de l’Ouest de 1940, trans. Nicole Thiers, Paris: Éditions Belin, 2003-2015, 517.
Map: Maj L. F. Ellis, The War in France and Flanders: 1939-1940, London: Her Majesty’s Stationary Office, 1953.
License
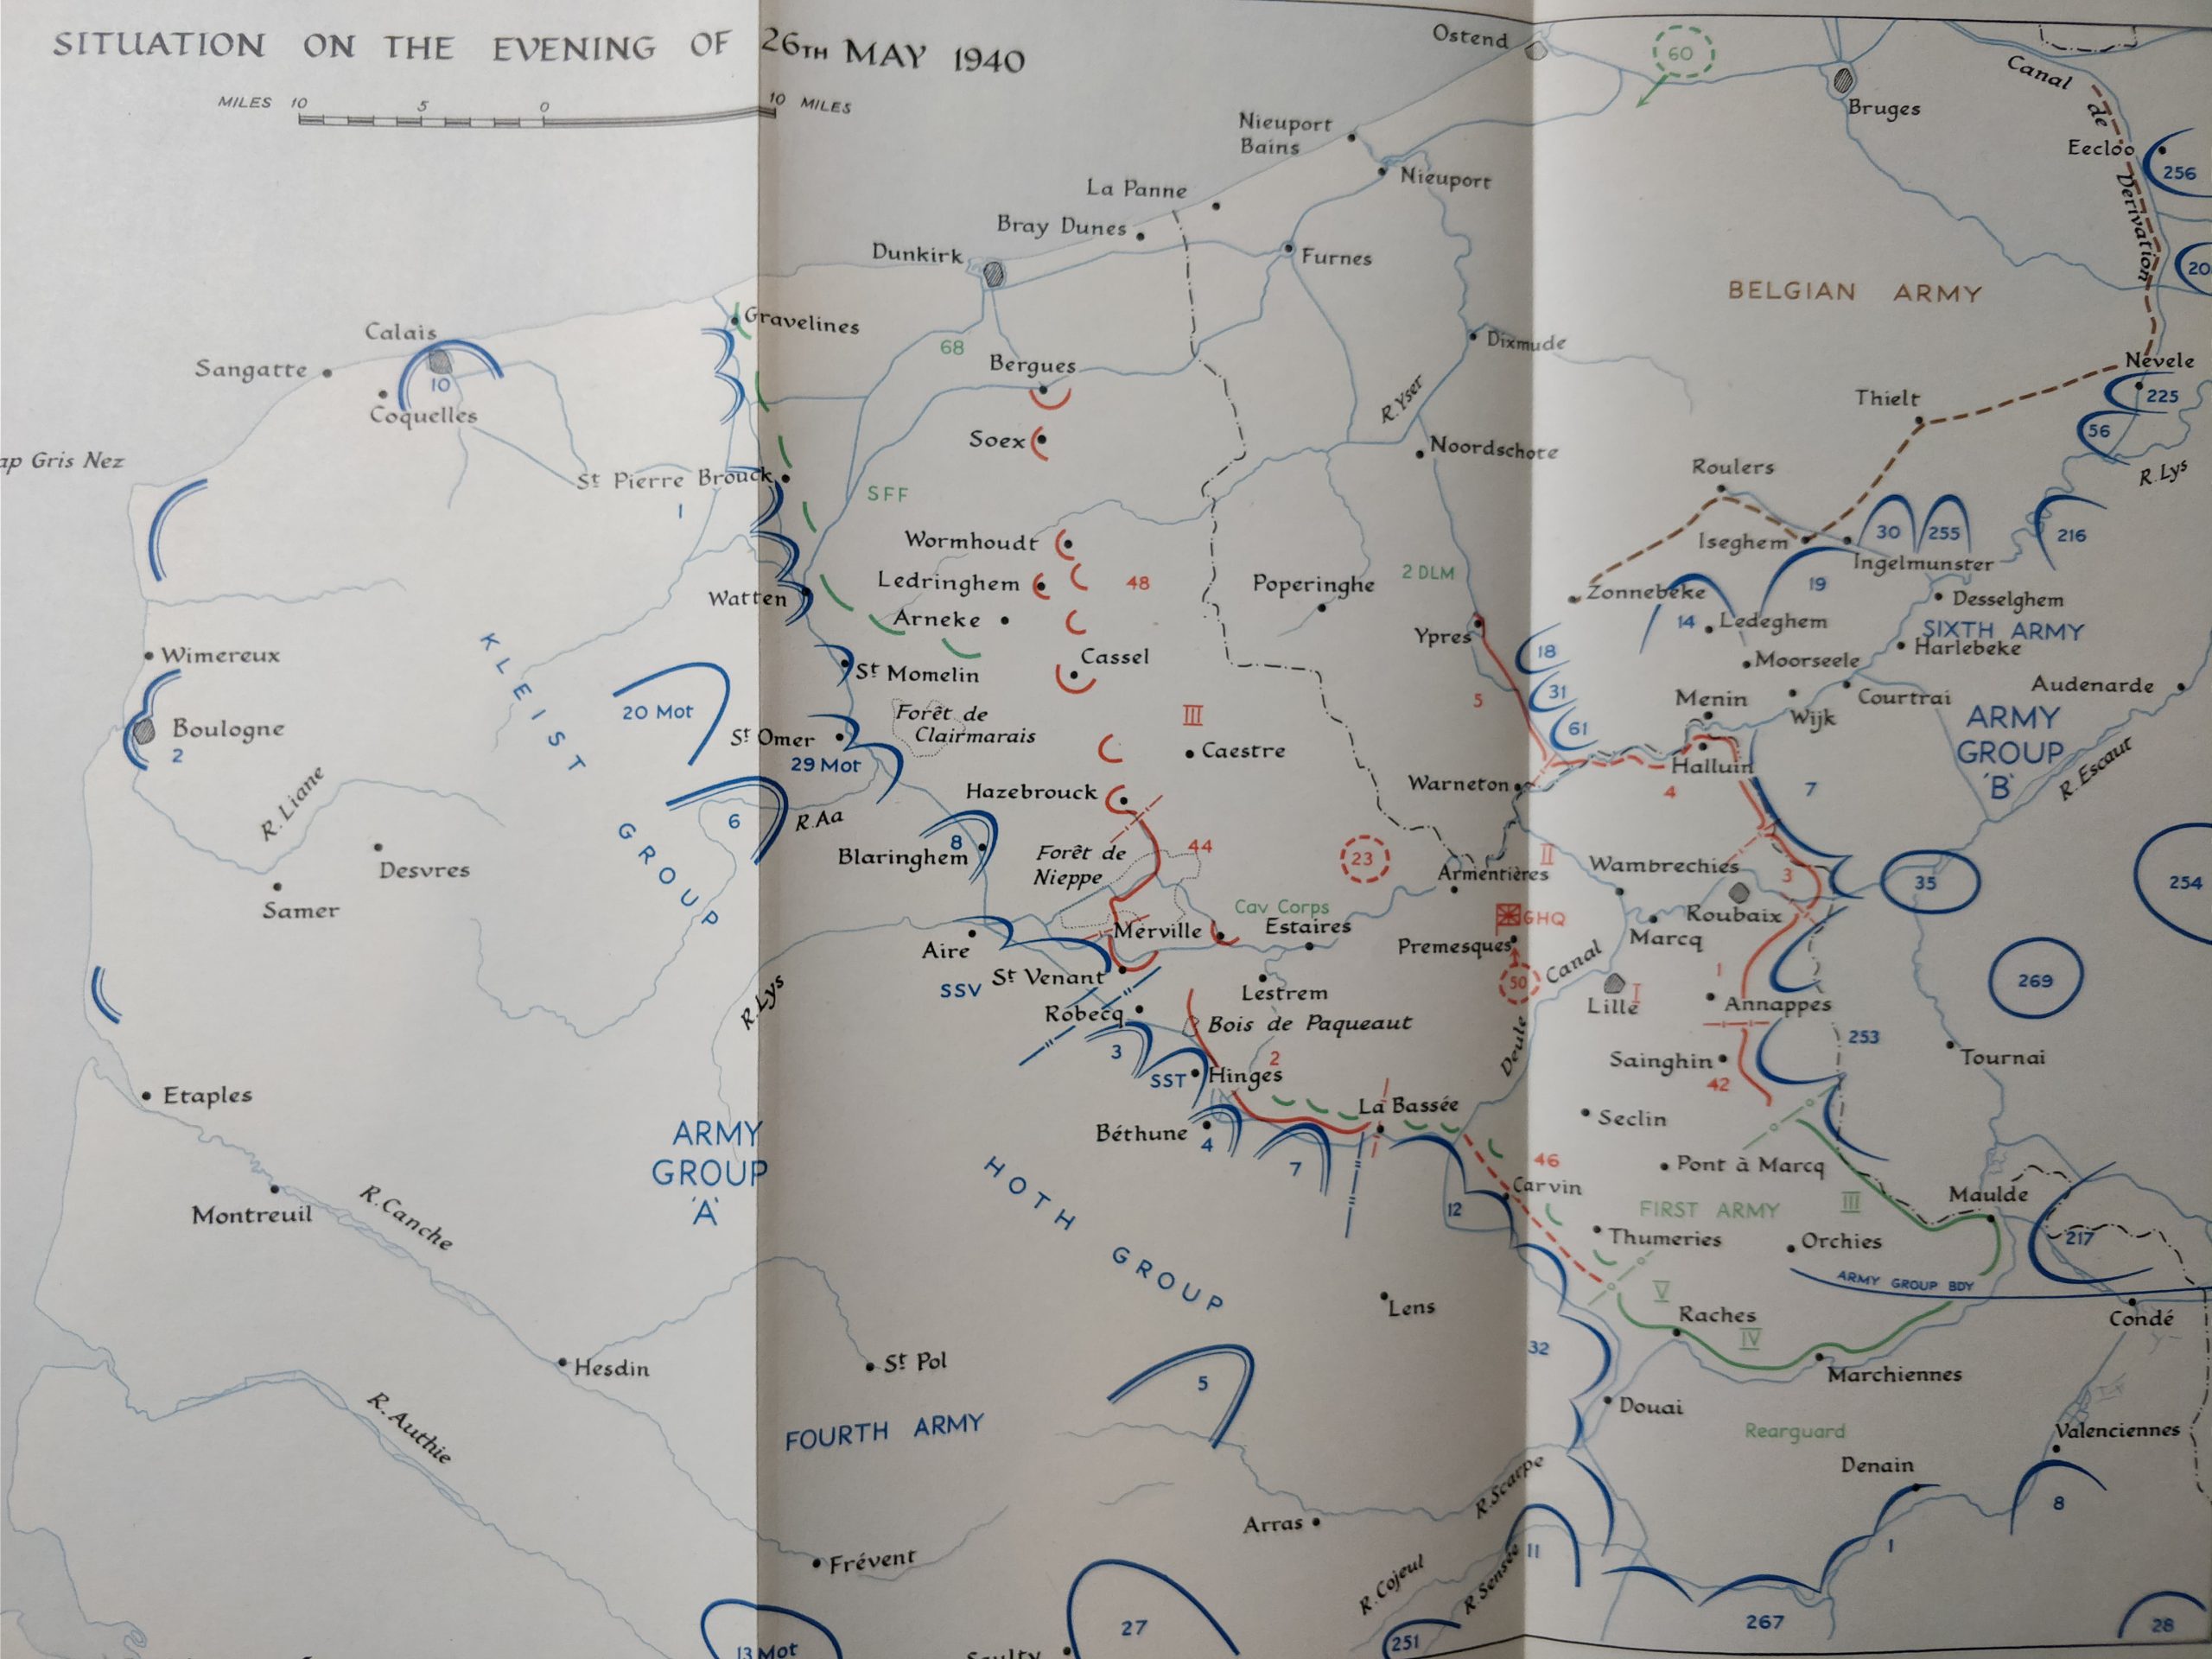
Situation on the evening of May 26th
The Belgian line cracks, leaving a threatening gap in the east. The British 5th Division plugs it (between Ypres and Warneton). As they arrive, the position is already under fire: the German 18th, 31st, and 61st Infantry Divisions are there. The British 50th Division (by Premesques) is on its way to help the 5th Division to plug the gap. Army Group A is ordered to resume its offensive at 1530 hours. However, because of the preparations to resume the attack, the panzers would not move again until the next day at 0800 hours. In the meantime, some German units attacked without armored support. Operation Dynamo starts at 1857 hours.
Without this move, the Germans might have been able to breach the pocket and trap several, if not most of the Allied divisions.
Source: Major L. F. Ellis, The War in France and Flanders, Uckfield: The Naval & Military Press Ltd, 1953-2004, Chapter XI, Kindle, Dildy, Dunkirk, 32, 33
Map: Maj L. F. Ellis, The War in France and Flanders: 1939-1940, London: Her Majesty’s Stationary Office, 1953, 183.
License
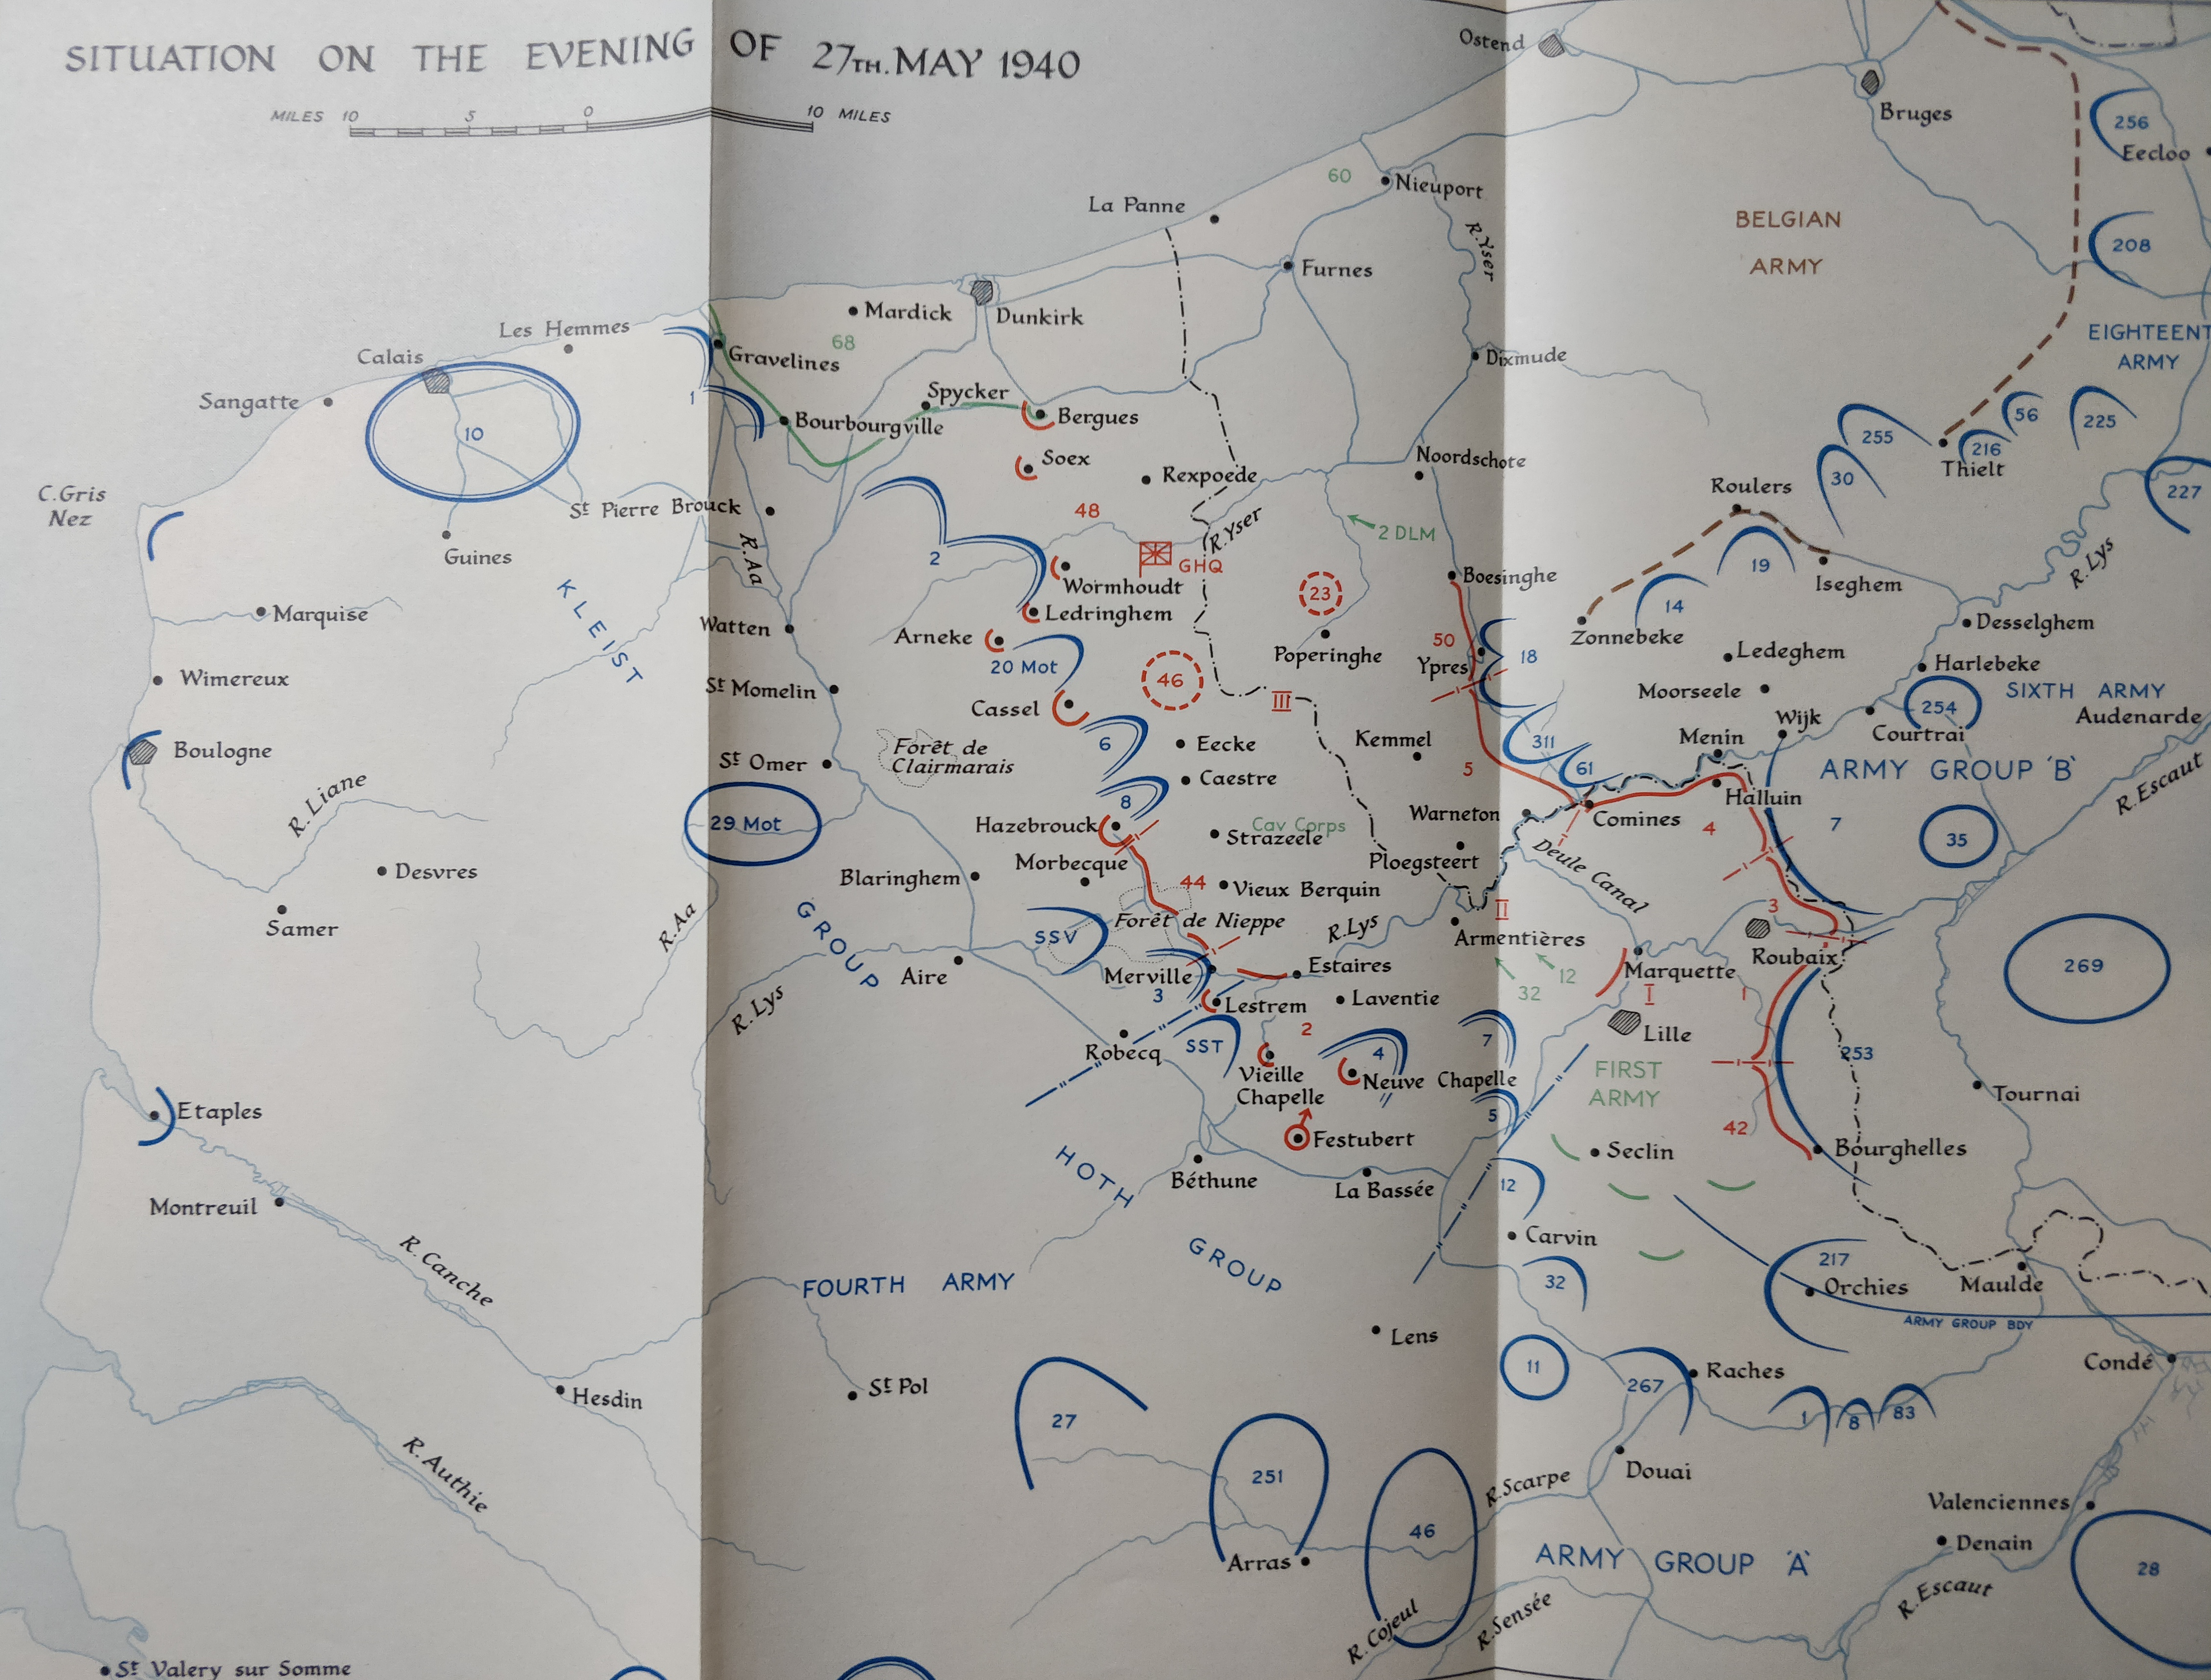
Situation on the evening of May 27th
Army Group A resumes its advance at 0800 hours. Both German Army Groups A and B attempt to encircle the Allies through the Poperinghe-Kemmel line. The British 50th Division joins the 5th Division to plug the gap in the east (between Boesinghe and Comines), under assault by the German 18th, 31st (incorrectly labeled as the 311st), and 61st Infantry Divisions. The French First Army pulls toward Lille. In the afternoon, Belgian King Léopold III informs the British and the French of his intention to capitulate. He enters negotiations with Germany at 1545 hours. It is the first full day of Operation Dynamo: 7,669 soldiers are evacuated.
Sources: Dildy, Dunkirk, 40; Grumberg “Dunkerque,” 25.
Map: Maj L. F. Ellis, The War in France and Flanders: 1939-1940, London: Her Majesty’s Stationary Office, 1953, 201.
License
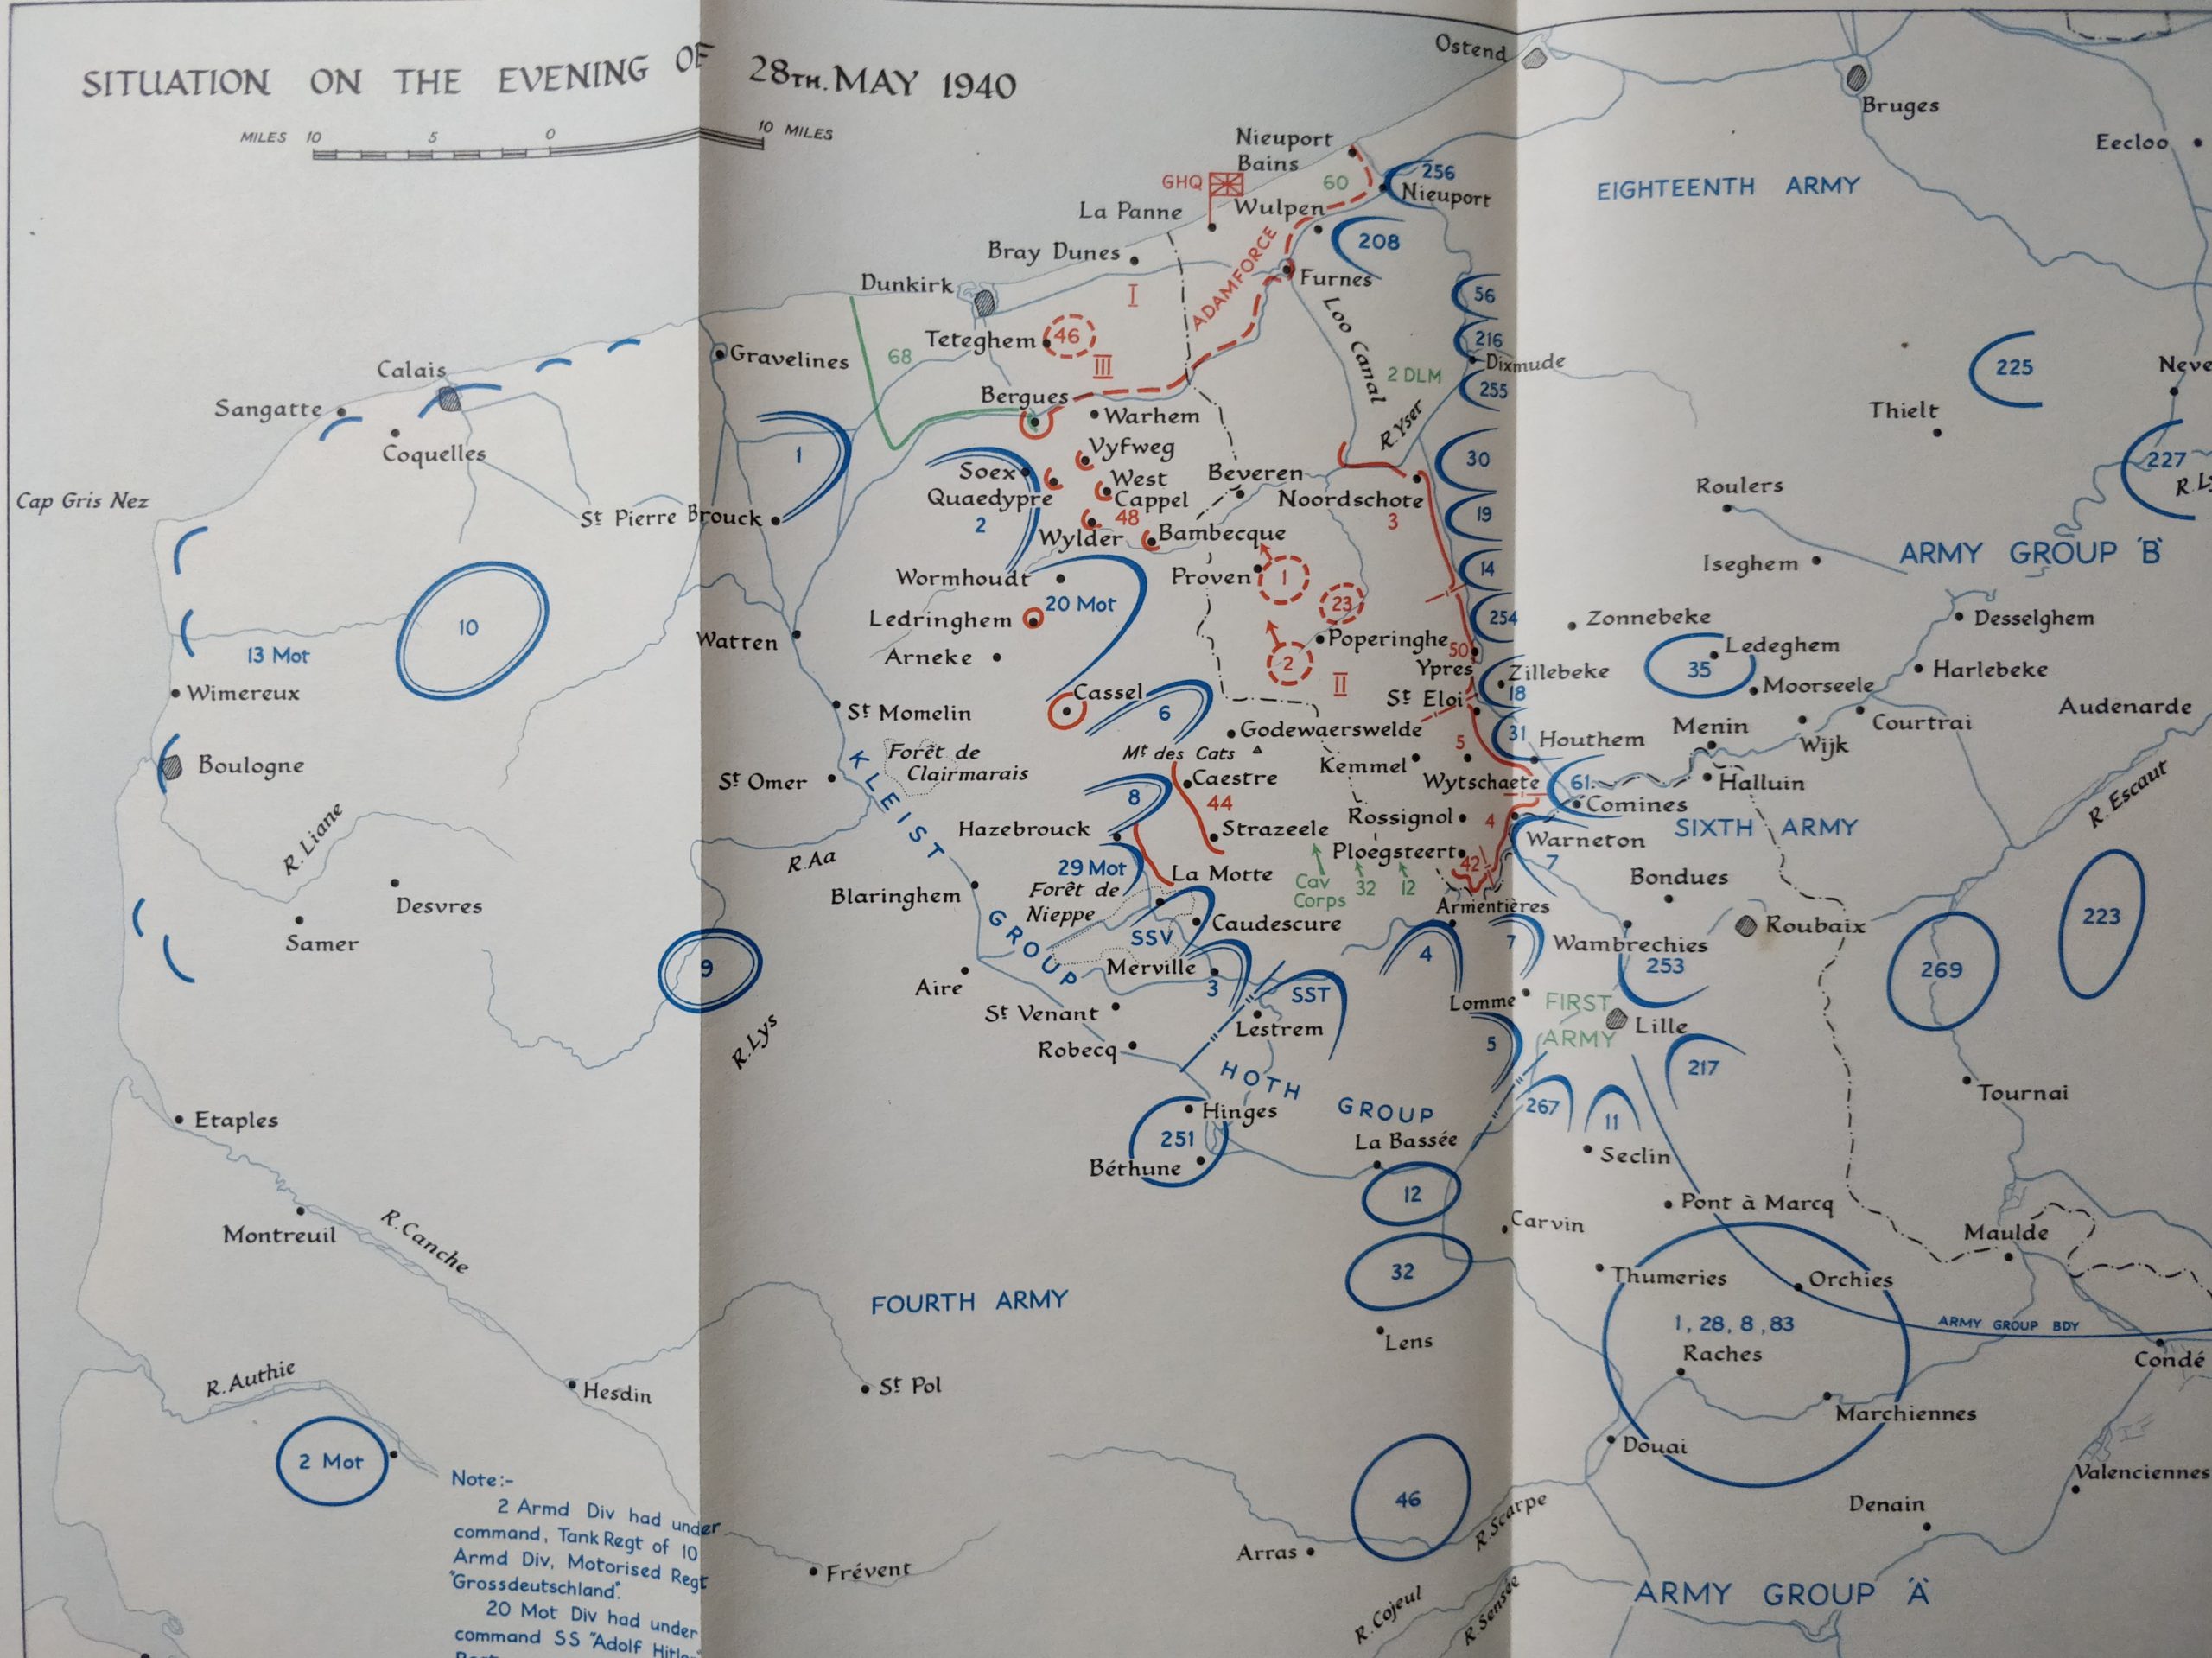
Situation on the evening of May 28th
The Belgian government capitulates shortly after midnight and a ceasefire is in effect at 0400 hours. The entire northeastern flank of the pocket is now defended only by the French and the British. Thanks to the Belgian capitulation, eight German divisions join the fight against the Franco-British pocket. The pocket shrinks as the Allies retreat toward Dunkirk. The French First Army is trapped in Lille. They would fight until June 1st and surrender only when out of ammunition. Operation Dynamo: 17,804 soldiers are evacuated.
While the pocket shrinks because of the Belgian surrender and German attacks, it is mainly because of the Allied fighting withdrawal that the pocket reduces by the day.
Sources: Dildy, Dunkirk, 40; Grumberg, “Dunkerque,” 25.
Map: Maj L. F. Ellis, The War in France and Flanders: 1939-1940, London: Her Majesty’s Stationary Office, 1953, 215.
License
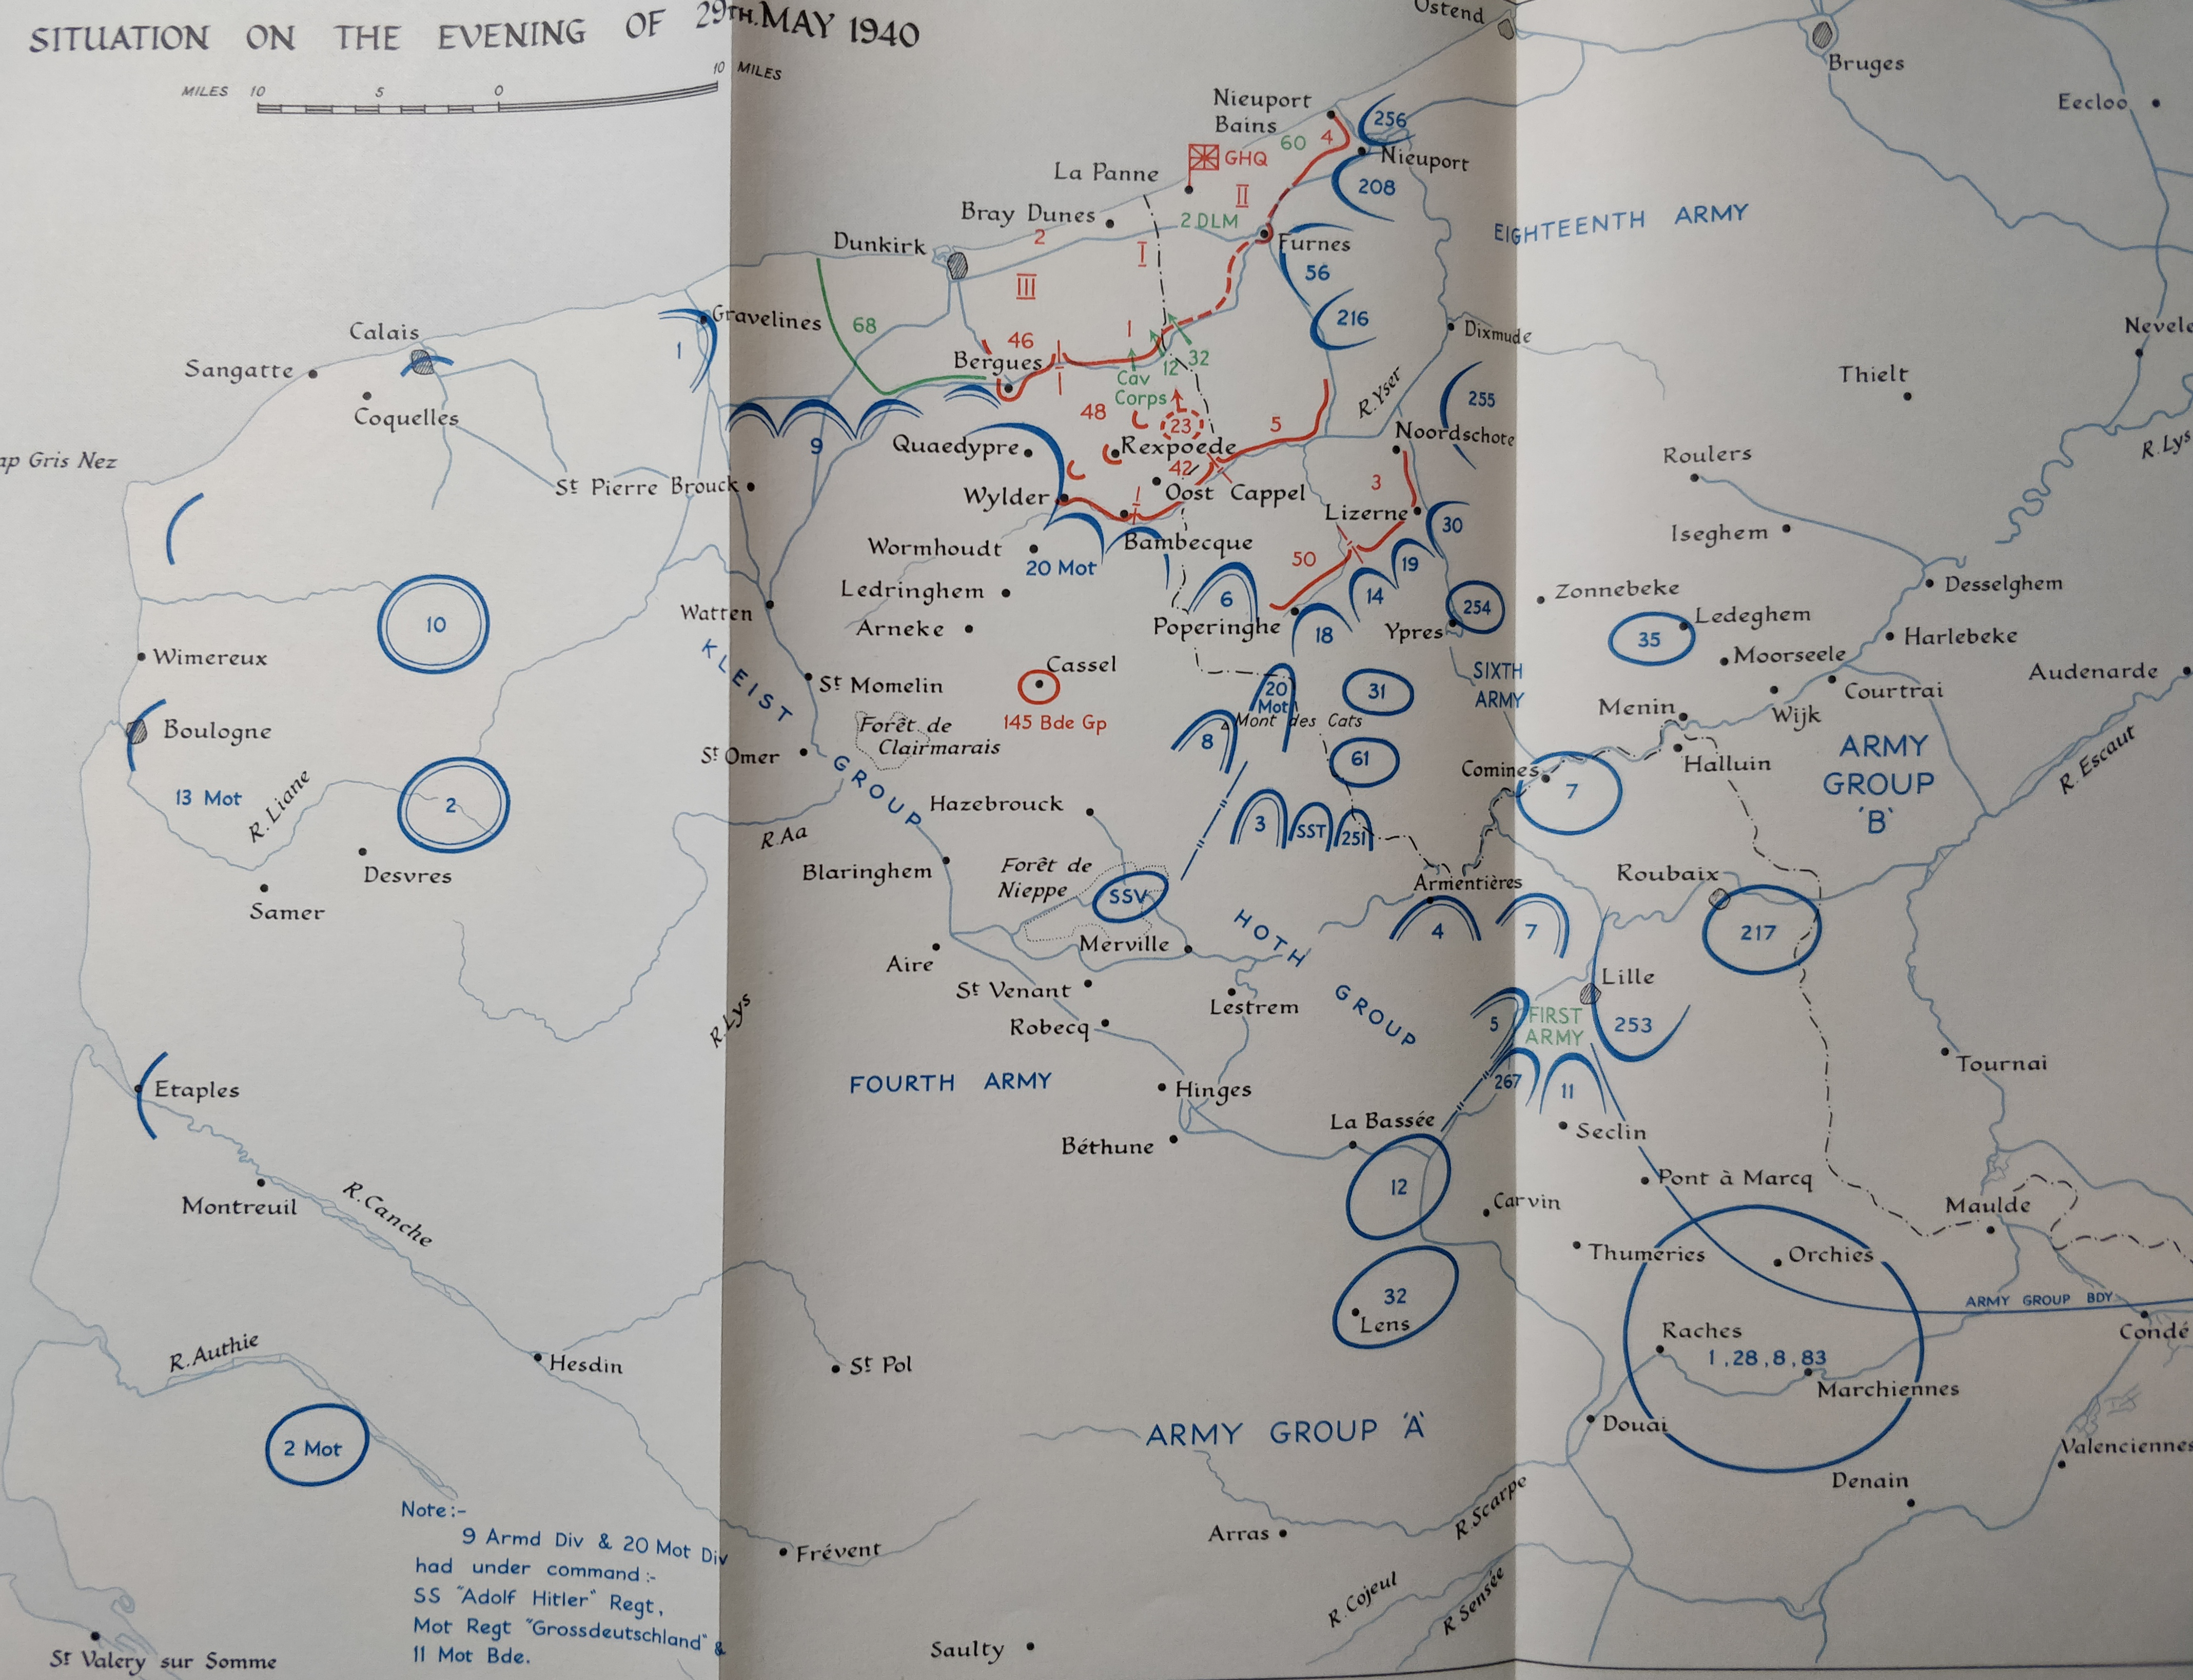
Situation on the evening of May 29th
The Allies keep retreating to the coast. Operation Dynamo: 47,310 soldiers are evacuated, including the first French soldiers, making up 2% of the evacuees of the day.
Source: Grumberg, “Dunkerque,” 25.
Map: Maj L. F. Ellis, The War in France and Flanders: 1939-1940, London: Her Majesty’s Stationary Office, 1953, 224.
License
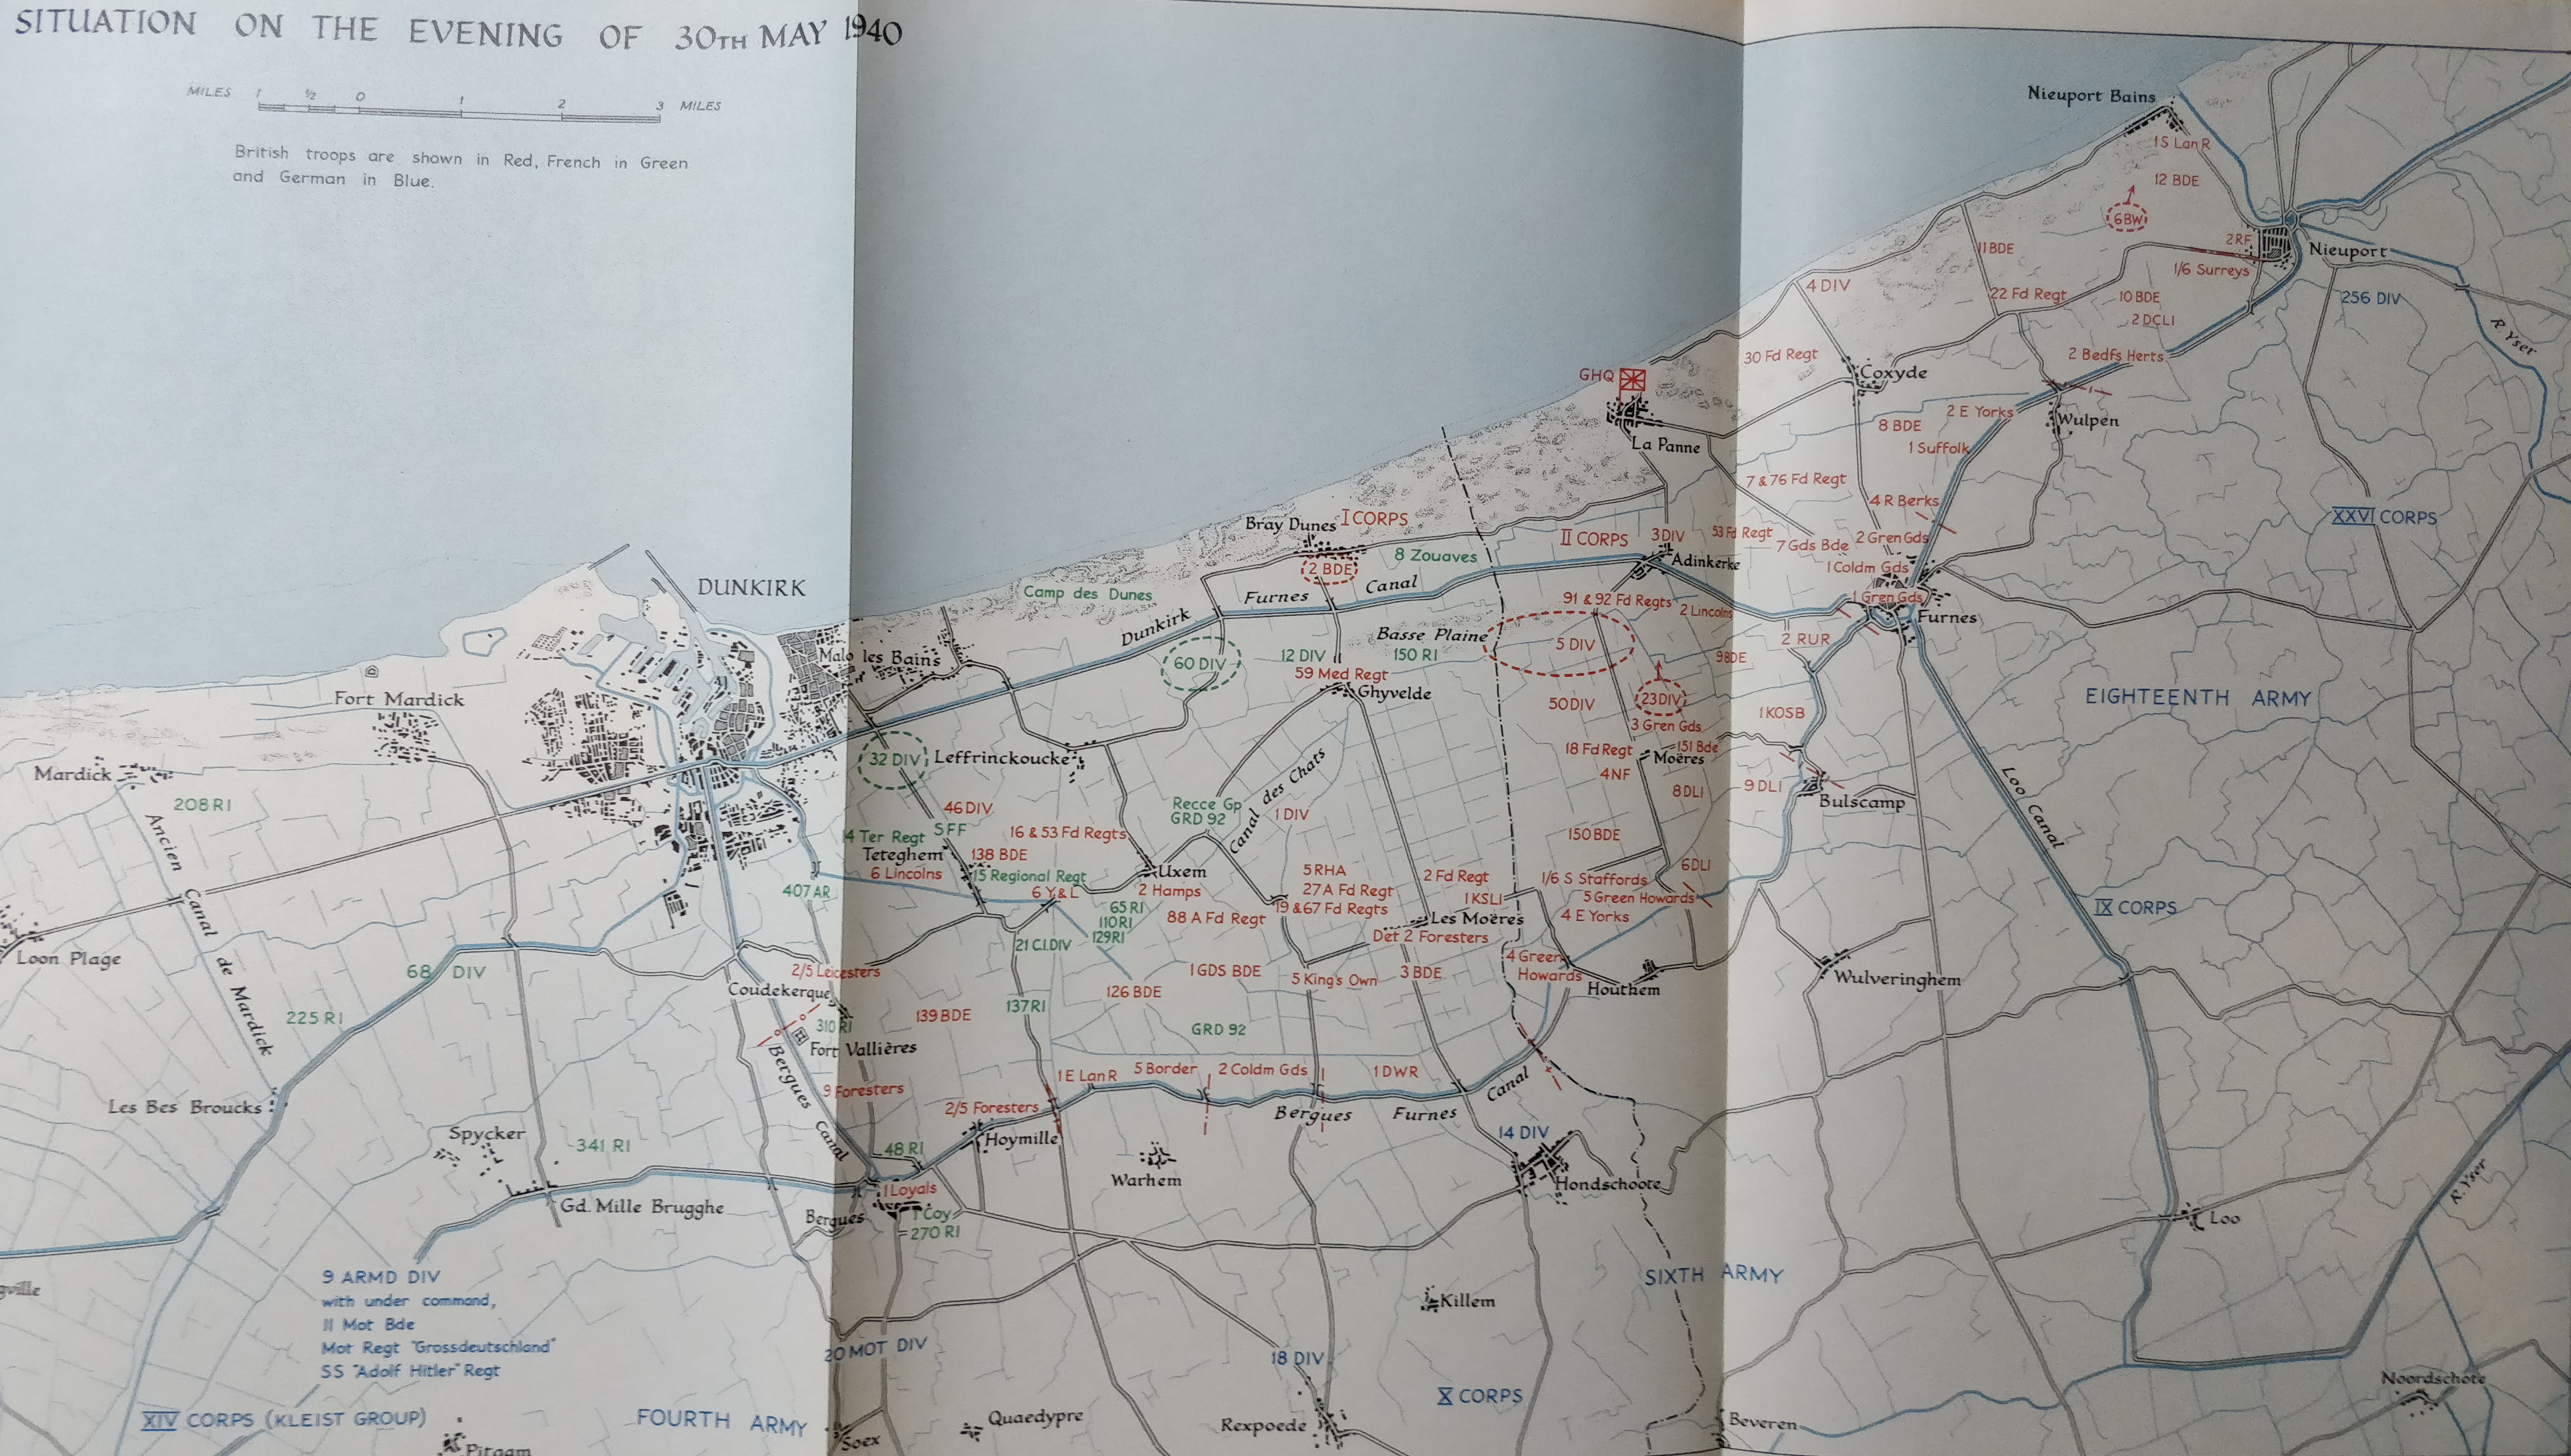
Situation on the evening of May 30th
The Dunkirk pocket is now only the size of a beachhead. Operation Dynamo: 53,823 soldiers are evacuated.
Source: Grumberg, “Dunkerque,” 25.
Map: Maj L. F. Ellis, The War in France and Flanders: 1939-1940, London: Her Majesty’s Stationary Office, 1953, 238.
License
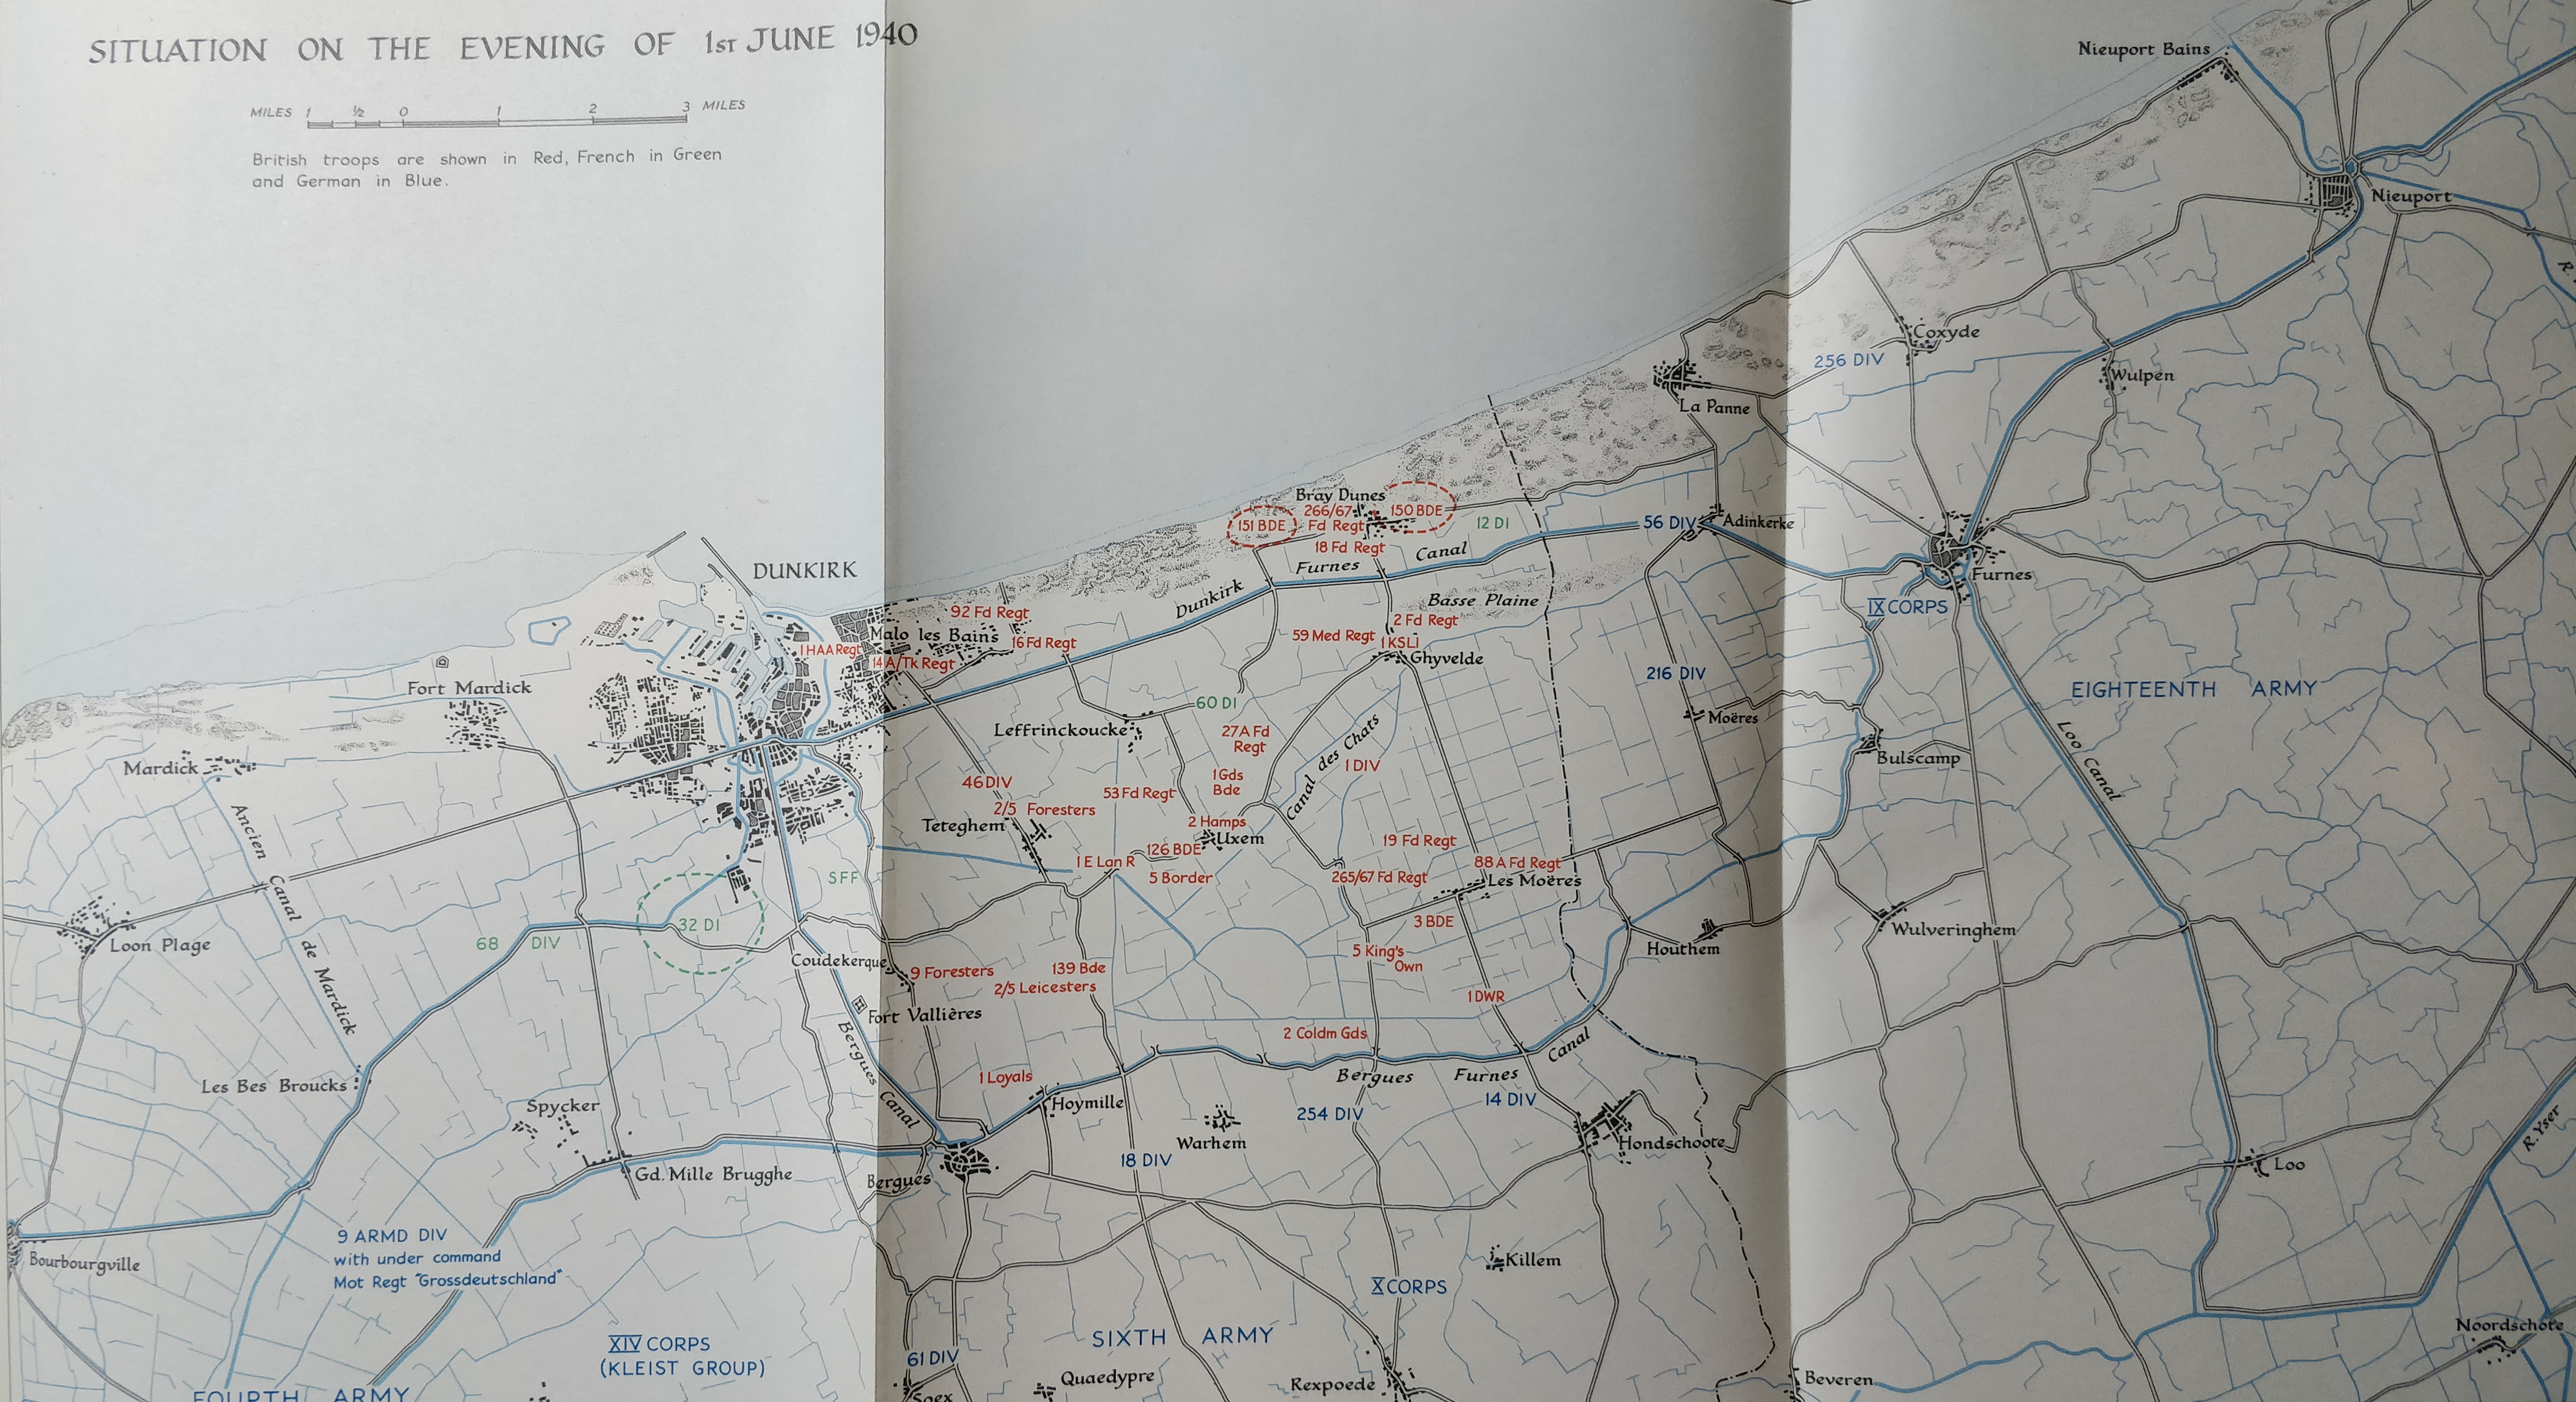
Situation on the evening of June 1st
Operation Dynamo: 64,429 soldiers are evacuated. For the first time and until the end of Operation Dynamo on June 4th, the majority of the evacuees are French. On June 1st, they made up 58% of the evacuees. On June 2nd, 26,526 soldiers would be evacuated. On June 3rd, 26,746, and on June 4th, 26,175.
Source: Grumberg, “Dunkerque,” 25.
Map: Maj L. F. Ellis, The War in France and Flanders: 1939-1940, London: Her Majesty’s Stationary Office, 1953, 244-45.
License
License
[1] Karl-Heinz Frieser, trans. ed. John T. Greenwood, The Blitzkrieg Legend: The 1940 Campaign in the West, Annapolis: Naval Institute Press, 2005, 301.
[2] Ibid., 293, 300.
[3] Maj L. F. Ellis, The War in France and Flanders: 1939-1940, London: Her Majesty’s Stationery Office, 1953, 183.
[4] Pierre Grumberg, “Dunkerque, le miracle de la défaite,” Guerres & Histoire, no. 37 (2017), 25.
[5] Jean Lopez, “Pourquoi Hitler a-t-il laisse échapper la victoire ?,” Guerres & Histoire, no. 37 (2017), 33; Douglas C Dildy, Dunkirk 1940: Operation Dynamo, Oxford: Osprey Publishing, 2010, 25; Ernest R. May, Strange Victory: Hitler’s Conquest of France, London: I.B. Tauris, 2000-2009, 474-75.
[6] Jean Lopez, “Pourquoi Hitler a-t-il laisse échapper la victoire ?,” Guerres & Histoire, no. 37 (2017), 33.
[7] Ibid.
[8] Ibid.
[9] Ibid.
[10] These divisions are the 20th Motorized Infantry Division, the 3rd, 4th, 6th and 1st Panzer Divisions. See the situational maps of May 24th and May 26th featured in Ellis, The War.
[11] Ibid.; Dildy, Dunkirk, 25.
[12] Frieser, The Blitzkrieg, 299.
[13] Ellis, The War, 174.
[14] Ibid., 140.
[15] Ibid., 148-49.
[16] Ibid., 172.
[17] Ibid., 174.
[18] Dildy, Dunkirk, 31.
[19] Ibid.
[20] Ibid.
[21] Ellis, The War, 214.
[22] Walter Lord, The Miracle of Dunkirk, New York: The Viking Press, 1982, 209.
[23] Dildy, Dunkirk, 61.
[24] Lord, The Miracle, 210; Dildy, Dunkirk, 61.
[25] Grumberg, “Dunkerque,” 25.
[26] Ellis, The War, 214.
[27] Ibid.
[28] Ibid., 151.
[29] Lord, The Miracle, 41.
[30] Dildy, Dunkirk, 6.
[31] Ellis, The War, 180.
[32] Philip Warner, The Battle of France: 10 May-22 June 1940: Six Weeks Which Changed the World, London: Simon & Schuster, 1990, 160.
[33] Lord, The Miracle, 86.
[34] Grumberg, “Dunkerque,” 25.
[35] Ibid., 186-87.
[36] See the situational maps of May 24th and May 26th featured in Ellis, The War; Dildy, Dunkirk, 24.
[37] Ellis, The War, 191, 190.
[38] Ibid., 191.
[39] Ibid., 225.
[40] Robert Forczyk, Case Red: The Collapse of France, Oxford: Osprey Publishing, 2017-2019, 222; See the situational maps of May 28th and May 29th featured in Ellis, The War.
[41] Forczyk, Case Red, 222.
[42] Dildy, Dunkirk, 80.
[43] Ibid., 78.
[44] Ibid.
[45] Forczyk, Case Red, 223-24.
[46] Ibid., 224; Dildy, Dunkirk, 81, 84-5; Grumberg, “Dunkerque,” 27; Martin Alexander, Pierre Grumberg, “L’évacuation de la BEF n’a rien d’une trahison,” Guerres & Histoire, no. 37 (2017), 29.
[47] Lord, The Miracle, 22-3; See the situational maps of May 24th and May 26th featured in Ellis, The War.
[48] Warner, The Battle, 137.
[49] Ibid., 132.
[50] Lord, The Miracle, 105-6.
[51] Ronald E. Powaski, Lightning War: Blitzkrieg in the West, 1940, Hoboken: John Wiley & Sons, Inc., 2003, 271.
[52] Frieser, The Blitzkrieg, 295.
[53] Lord, The Miracle, 23.
[54] Powaski, Lightning War, 239.
[55] Lord, The Miracle, 23.
[56] M.R.H. Piercy, “The Manoeuvre that Saved the Field Force,” in The Battle for France & Flanders 1940: Sixty Years on, ed. Brian Bond and Michael D. Taylor (Barnsley: Leo Cooper, 2001), Kindle.
[57] A. D. Divine, Dunkirk, New York: E.P. Dutton & Company, 1948, 33.
[58] Ibid., 38.
[59] Ibid., 58-9.
[60] Ellis, The War, 181.
[61] Ibid., 178.
[62] Forczyk, Case Red, 218-19.
[63] These divisions are the 14th, 19th, 30th, 255th, 216th, 56th, 208th and the 256th Infantry Divisions. See the two situational maps of May 27th and May 28th featured in Ellis, The War.
[64] Frieser, The Blitzkrieg, 300.
[65] Ellis, The War, 227; Dildy, Dunkirk, 25.
[66] Powaski, Lightning War, 303-4.
[67] Grumberg, “Dunkerque,” 26.
[68] Ellis, The War, 178.
[69] Dildy, Dunkirk, 59, 60.
[70] David Greentree, German Infantryman versus British Infantryman: France 1940 (Oxford: Osprey Publishing, 2015), Analysis – Lessons Learned: The Germans, Kindle.
[71] Forczyk, Case Red, 104.
[72] Ibid., 218; See Map 45 featured in Frieser, The Blitzkrieg.
[73] Forczyk, Case Red, 218.
[74] Powaski, Lightning War, 303-4
[75] Lord, The Miracle, 209; Dildy, Dunkirk, 9.
[76] Ellis, The War, 227.
[77] Dildy, Dunkirk, 61.